MA 110 FA2023: Concepts of Math
Syllabus Concepts of Mathematics Fall 2023
Professor Buck
There are five projects assigned, and a final exam. The projects and the final exam are each worth 20 points, and there is a participation grade, which is also worth 20 points. The plan is to meet on Tuesdays in-person, and to meet on Thursdays remotely via Zoom. Any changes to this will be announced. The Zoom link will be sent in an email and available on Canvas.
About the participation grade. You are expected to attend each meeting of the class. When on Zoom, you are expected to have your camera on. We will spend a good part of each meeting working on the projects, so you are expected to have your materials with you at each meeting. We will break up into smaller groups. You are expected to have your video and audio on the entire time in the smaller groups. You are expected to introduce yourself to the other members of your group. You are expected to discuss the project and work on it while you are in the group. I will move from group to group, and check in with everyone.
Project Due Dates:
Project 1: Sept 15
Project 2: Oct 6
Project 3: Oct 27
Project 4: Nov 15
Project 5: Dec 6
The projects are described below. Videos related to the projects are available at the knotbuck channel on youtube and the grbuck account on tiktok. The videos are short, and may need repeated viewing or to be slowed or paused for full engagement.
To complete a project you take photos or screenshots of your work, and you combine these images into a single PDF, and submit the PDF via Canvas. To repeat, the work for a project must be submitted as a single PDF, usually of several pages. A single PDF. If you need to learn how to combine multiple pages into a single PDF, now is the time to do it. If you use a Mac, Preview will combine images into a single PDF. You may also need to learn how to reduce PDF file size, if Canvas objects to the file size.
To receive credit, each image of your work needs be signed and dated. If you are taking a photo of a drawing, simply sign and date it before you take the photo. If you are taking a photo of 3D work you can place a signed and dated slip of paper in the shot. If you are submitting a computer image such as a screenshot, add your name and the date as an annotation — this just means you type over the image. If you are using a Mac, Preview has an annotate tool in the Tools menu.
Materials List
There is no textbook for this course. But you will need some materials and tools. Some of them will be distributed in class: string, rope, card stock, pushpins.
But you will need to provide on your own:
- Scissors. You will be happier if they are reasonably heavy duty — don’t have to be expensive or huge, just not kid’s scissors.
- Tape. A couple rolls, and could be different colors but don’t have to be. Solid color is better than transparent, and while duck tape can be made to work, you will find a not so thick tape better for taping paper, which is most of what you will be using it for.
- Plenty of plain white paper, like printer or copier paper. No lines. No lines. No lines.
- A couple pieces of corrugated cardboard, large enough to pin a standard sheet of paper on. It needs to hold pushpins or tacks, and you need to be able to draw on a sheet of paper pinned to it. There are other materials that can work, like some bulletin board material like cork, but, as I said, you have to be able to draw on top of it, so it can’t be too soft. It works to pin thin cardboard to a bulletin board, and then draw on paper on top of that. There are usually boxes around from moving that you can cut the cardboard from. Tape the two pieces of cardboard together along the edges, to give yourself a double thick board you can pin in without the pins sticking out the back. One of the youtube videos for the course illustrates this process. Be sure to bring the cardboard, white paper and pens to the first class meeting.
Some topics we will likely address: Circles and lines, Perpendicular lines. Equilateral triangles. Other regular shapes, ellipses, envelopes. Paper constructions of shapes: equilateral triangle, squares, pentagons. 3D: Platonic Solids built from planar frames. Other solids from frames — the square base pyramid. Folding paper tetrahedron. Stellated solids, including stellated icosahedron. Tilings of the plane, and 3d. Various tilings. Of the regular n-gons, only n=3, 4, 6 tile. Path tilings, games, Morrocan, Escher and Penrose tilings. Topology, knots. Topology, braids. Transformations and matrix operations. Symmetry groups. Coordinate systems — rectangular and polar. Equations of circles and lines. Distances. Equations and graphs of quadratics and cubics. Motion by gravity. Equations of ellipses, hyperbolas. Planetary orbits. Dimension. Length, area and volumes in 2 and 3 dimensions. King Kong. Areas and volumes of cubes, cylinders, cones, spheres, pyramids, surfaces and solids of revolution. Waves. Trigonometric functions. Wavelength, frequency, music electromagnetic spectrum, redshift — doppler effect, vision.
Project 1: String and Straight Edge Constructions
To get started watch the video titled
String pushpin cardboard geometry
on the knotbuck channel on youtube. Other videos on the channel will relate to parts of this project.
As in the videos, using string and pushpins to make circles, and a paper fold to draw straight edges, do the following:
1. Make three patterns, each pattern having at least six elements, where an element is either a circle or a line. In these patterns, lines must be determined by connecting intersection points of circles, and/or lines which were previously drawn. Begin with two elements, where elements are points, lines and circles. So you could begin with two lines, or a point and a circle, etc. Don’t assume anything about the elements you can’t prove. For example, if you begin with two lines, you can’t assume they are perpendicular, even if they look to be when you draw them. You can assume lines are perpendicular once you have
constructed them to be that way. This is an important point, so we repeat it. To draw the lines, you must use points you have already determined. So point A might be a point where two circles intersect. Point B might be where two other circles intersect. Then you can draw a straight line that passes through points A and B. This is what is meant by determined. In general, you can make a line as long as you like. Once a line has been determined by passing through two points, you can continue that line with the straight edge of a folded sheet of paper that has been lined up along the line. See videos.
2. (Euclid’s Proposition 1) Make an equilateral triangle. See
video. Prove (give the reasoning why) that the triangle is equilateral — the three sides are the same length.
3. Using these techniques, draw a hexagon, which can be made up of six equilateral triangles.
4. Use circles to make perpendicular lines. See video. Make two patterns that have at least four perpendicular crossings each. When creating these patterns, lines may only be drawn by connecting points determined by intersections. Similarly for centers of circles except for the first two circles in a pattern.
5. Construct a square. Hint: look at the video of the octagon
construction.
6. Bisecting an angle. See video. Use this technique to construct an octagon (eight equal angles and equal sides), by beginning with perpendicular lines. Are there other regular polygons (equal length sides) you can construct this way?
7. Use the bisecting angle technique to find the center of an equilateral triangle.
Ellipses and similar constructions. See video. We have a technique for making ellipses: a loop around two pins that are some distance apart, and pull tight as you did to draw the circles — the pen and the two pens will make the loop into a triangle as you revolve around the pins. If you change the distance between the pins, or the length of the loop, you change the eccentricity of the ellipse. A circle has zero eccentricity, a thin long ellipse has high eccentricity.
8. Create at least three designs using ellipses with differing
eccentricity. The pin locations are called the foci of the ellipse.
9. Try similar constructions, though now with more than two pins inside the loop, for example, the pins might be at the vertices of an equilateral triangle. Or, put the loop around one pin, place another pin outside the loop. What happens now when you pull the loop tight and revolve around the first pin? See the geometry lion video for ideas on drawing a scroll this way. You can also make spirals. Do at least three of these constructions, perhaps combining these techniques with circles, lines, ellipses, etc.
Envelopes. See video for examples of envelope constructions. The general idea is to make curves, or at least things that look like curves, out of many straight lines.
11. Do at least three envelope constructions, at least one of which includes a circle or ellipse as as the base or part of the base. See video.
Grids and repeated patterns.
12. Using our techniques, make two repeated patterns of any sort — do it enough that it is clear how the pattern would repeat if you continued forever. Also figure out how to make two kinds of graph paper — that is, repeated regular grids. Make sure the graph paper patterns repeat in two dimensions, meaning regular spacing up and down as well as right and left.
More complex designs.
13. Use the string and straight lines techniques to create two of your own patterns with some complexity — see for example the star videos — but try to do something different.
Project 2: Folding and Tiling
Geometrical constructions using paper. We’ve seen how to do some geometry using string — the basic one-dimensional object. Now we try using a sheet of paper — a basic two-dimensional object. We have already seen that you can create a straight line by folding a sheet of paper.
General folding advice:
A. To make a crease tight you can use the barrel of a pen — pressing down as you run it along the fold.
B. One way to make the paper easy to work with is to also fold each fold in the opposite direction. That is, the paper has two sides, A and B. Say you fold so that side A is on the inside. Then fold again, along the same crease, so that side A is on the outside and B on the inside.
C. If you use heavier paper (card stock), and fold both directions as above, you can make an object that will easily fold and unfold and refold along the same creases.
D. You can use another folded sheet as a straight edge to draw a line along your folds to make them stand out more once you have created them.
PART I. Folding and angles.
First, we want to see that you can make a right angle using folds. But we don’t want it to depend on edges that have already been cut in the paper. So first take a sheet of blank paper — no lines — and tear or cut all around the edges so that there are no straight edges. It should look sort of like a cloud. Now fold it roughly in half — we say roughly because it is irregularly shaped. Leaving that fold in, now fold again, folding the fold so that the fold lines up perfectly with itself. You should see a nice square corner in your hand. When you unfold the paper, you should see folds that meet in a right angle.
1. Now that you have made a right angle, fold more, and by lining up folds, see if you can make an accurate rectangle.
2. Then see if you can cover an irregularly shaped sheet with a nice even rectangular grid. You begin with an irregularly shaped piece of paper — no straight line edges at all — and by folding create a regular rectangular grid.
3. Next see if you can make a grid of triangles — they do not need to be equilateral.
4. Make an octagon by combining folding with circle and line drawing. Hint: make use of the technique of bisecting an angle by folding. See video on folding and angles.
PART II. Triangles and pentagons.
We can now assume we could, if we needed to, fold rectangles, so we can begin with rectangular sheets (standard paper). See the folding polygons video to see techniques of folding equilateral triangles, squares, and pentagons. When we were using string, we were able to construct regular triangles, squares, hexagons and octagons. So we were missing pentagons (five sides) and septagons (seven sides) in this sequence.
To fold a pentagon, first cut a long rectangular strip — say about an inch wide the length of a regular sheet — don’t need to measure the width — just fold evenly. Next take the strip and tie it in a simple knot, pulling tight and flattening at the same time. If you get it right it will miraculously result in a pentagon. It may take a few attempts to get a good one.
5. a. Fold five equilateral triangles of various sizes. b. Make five pentagons. c. See if you can fold a strip to make other shapes.
PART III. Tiling
If you look down on most floors that are not carpeted, you will see some sort of tiling, that is, that the floor covering is made up of pieces that fit together to cover the floor. This is sensible — it would be very difficult to manufacture and move and install rigid floors made of single large pieces (even rugs, which can be rolled up, often do not cover a floor with a single piece.
So, a natural question is: what shapes should we make the tiles? The main requirement is that we would like the tiles to fit together to cover the floor completely without gaps. Second, at least initially, we would like to use just one shape at a time — that is, tile the floor with many copies of the same shape. Not all shapes work. For example, if you try to tile with circular tiles, you will have gaps no matter how you arrange them. Think of another common shape which won’t work. Wood floors are usually tiled by very long rectangles, the lengths of which vary, so that is a tiling, however the shapes usually have the same width but not the same length. But we can see how having one dimension constant makes it easier to tile.
Clearly, if the rectangles all had the same width and length, you could tile. In fact there are several different kinds of tiling patterns you can make with rectangles.
6. Find three such patterns. You might find it easiest to do this by cutting out a bunch of similar rectangles (fold sheets over before you cut and you can make many at the same time) and arranging them on a surface in front of you.
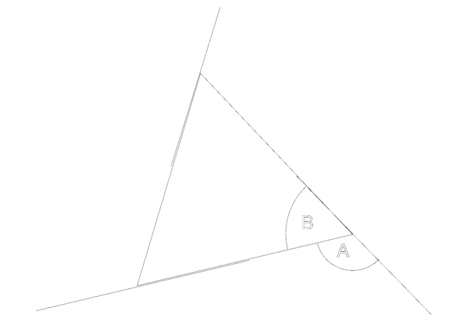
Let’s do a little analysis to see if we can predict which polygons will tile. First we need the notions of the exterior and interior angles of a polygon. Imagine yourself walking along a polygon, turning at each angle, and continuing until you return to the spot where you began. How much you had to turn at each corner we will call the exterior angle — in the diagram below of a triangle it is angle A. If you walk all the way around the triangle, you have turned completely around once — 360 degrees. You have made 3 turns. So each turn, angle A, is 120 degrees (360 divided by 3). The interior angle is angle B. Now that we can see that angle A plus angle B add up to a straight line — 180 degrees. Therefore angle B must be 180 – 120 = 60 degrees. We can use this method to find the interior angle of any regular polygon.
7. Use this method to find the interior angles of squares, pentagons, hexagons, septagons (7 sides), and octagons (8 sides).
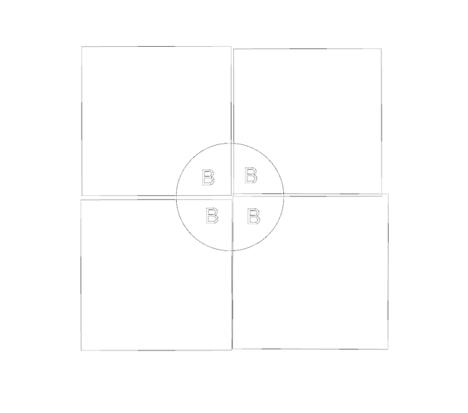
Next we consider how the polygons can fit together. We will call a point where tiles come together a vertex. In the diagram below is pictured the most common tiling with squares, and we can see a vertex in the center where four squares come together. If we consider a circle drawn around the vertex, we can see that the interior angles of the squares meeting there must add up to 360 degrees. This works for squares, because the interior angle B of a square is 90 degrees, and 4 X 90 = 360.
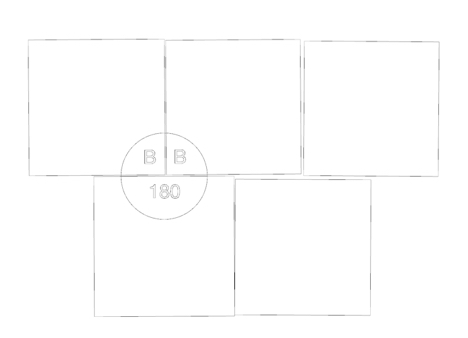
It is possible that a vertex would be on the side of a tile, but a straight side has angle 180 degrees, so therefore the interior angles meeting there must add up to 180 degrees to make the total 360 degrees. We can see an example of this with a different square tiling (see below).
This line of thinking leads to the conclusion that for a regular polygon to tile, its interior angle must divide either 360 or 180 evenly.
8. Use this analysis to show that there are only three regular polygons that tile the plane. A bit more detail: the regular polygons are the equilateral triangle, the square, the pentagon, the hexagon, the septagon, the octagon, and so on. The question is, which of these can you use to tile the plane? Can you do it with equilateral triangles? With squares? With pentagons? Etc. Identify them and give examples. Again, it might be easiest to cut out tiles. But sketches are also fine.
9. Do octagons tile the plane? If not, can they be combined with another polygon to tile? If so, identify the other polygon, and show that they work together by summing the interior angles at a vertex, and by picturing the tiling.
Pentagons do not tile the plane — prove this using interior angles if you haven’t already. If you combine pentagons with diamond and star shapes you can make infinitely many tiling patterns — even ones that don’t regularly repeat. If you do the analysis at a vertex, you can figure out what the interior angles of the diamond shape are.
10. Make a bunch of pentagon tiles. We saw how to fold a pentagon — in any case make one really good pentagon then use it as a template to outline others on heavy paper and cut them out. Then make some patterns — you will see the diamond and star shapes as the gaps in your patterns. See if you can make a pattern that doesn’t seem to repeat.
General tiling:
10. There are all sorts of tiling patterns, using many different shapes. Create some of your own, using shapes that are not regular n-gons or rectangles (you could use these in combinations).
PART IV: The Platonic Solids
We have constructed some of the most natural 2D shapes — the regular triangle, square, pentagon, octagon. Here regular means the sides are all the same length, and the angles are all the same as well. That is, the square has four equal angles, the regular pentagon has five equal angles, and so on. We constructed the regular polygons of 3,4,5,6, and 8 sides. We did not construct the septagon — 7 sides. You are welcome to figure that one out for extra credit if you wish. We will now move into 3D, creating 3D shapes out of the regular polygons. We begin by making shapes out of several copies of a single regular polygon. For example, what sort of shapes can you make out of equilateral triangles? We start with a couple rules. First, we will require that the triangles meet full edge to full edge. This means that the points of the triangles must meet other points — they can’t meet an edge in the middle. A place where the points meet is called a vertex. The next thing we require is that the same number of polygons meet at each vertex. We start with the simplest example. First make four equilateral triangles. We know how to make these both by folding and with string. It is fine to make one good one and trace it carefully to make the other three. Construction may be easier if the triangles are made of heavier paper — cardstock or the like, or cardboard. Tape three triangles together such that they meet at a point — making a triangular pyramid — the base is a triangle. Tape along each of the seams where the edges meet. Now attach the fourth triangle to the base, again taping along the seams. Do a neat job of taping — you will find that taping each seam well will make for good construction, which will be important as we make more complicated shapes. You will have made a tetrahedron. Look at the shape carefully. Note that three triangles meet at each vertex. This shape can also be folded. Fold an equilateral triangle. Now fold one of the points over so that it lands in the center of the side opposite it — this should create three triangles in a row. Fold over from both sides so that you have one triangle in the center. Partially unfold those three folds and you will see the triangular pyramid. Tape the open seams. If this doesn’t make sense there are videos ….. Next make the shape that results from having four triangles meet at each vertex. Hint: you will need 8 triangles. Next make the shape that results from having five triangles meet at a vertex. (This one can be a challenge). You can’t make a closed shape with six or more triangles meeting at a vertex. Why? What shape results from three squares meeting at a vertex? Can you make a shape with four or more squares meeting at a vertex? Make the shape that results from having three pentagons meeting at each vertex. Can you make a shape with four or more pentagons meeting at a vertex? Can you make a shape out of hexagons? (You could try by starting with three of them and see if you can make a vertex). At the end of this experiment we arrive at exactly five shapes that can be made this way. The tetrahedron, which has 3 triangles meeting at a vertex. The octahedron, which has 4 triangles meeting at a vertex. The icosahedron, which has 5 triangles meeting at a vertex. The cube, which has 3 squares meeting at a vertex. The dodecahedron, which has 3 pentagons meeting at a vertex. These shapes are collectively called the platonic solids, and if you have worked through the questions above you have proved that these are all the possible shapes that can be made following the rules.
11. In sum, you should make the Platonic solids.
12. List the shapes you have made with their characteristics, and explain why these are the only possibilities.
Project 3: Topology: Knots, Braids and Links
The background for this project can be found on the following pages.
The KNOT app, which is discussed below, can be found at
knoteverywhere.com
There are videos related to this project available on the youtube and tiktok channels.
1. Tie a right trefoil, a left trefoil, and a figure eight.
2. Tie a square knot (a right trefoil and a left trefoil in the same rope). Tie a granny knot (two right trefoils, or two left trefoils, in the same rope).
3. Make a loop that looks like a complicated mess but can be factored into a product of trefoils and figure eights. Make a loop that looks like a complicated mess and is — it is prime and cannot be factored.
4. Show that knots can pass through one another. Tie a trefoil and a figure eight in the same rope and close the ends. Without opening the ends, work the trefoil to the interior of the figure eight.
5. Make a five move braid and write down its code.
6. Create a braid of at least six moves in four strands. Tape the braid to a surface. Now figure out the inverse and make that braid in the same strands, leaving the original braid taped down. Tape the inverse down. So now we should see a braid, followed by its inverse, in the same strands. Leave the ends taped down at the start of the original braid and at the end of the inverse, and release the braid and the inverse everywhere in the middle. If you do have a braid and its inverse, you should be able to comb the strands with the ends taped down — detangle them so they run straight from beginning to end without wrapping around each other at all. Describe how to find the inverse of a braid from its code.
7. Find a closed braid representation of the trefoil, the 5-1 knot, and any two or three component link.
8. Make a repeated pattern braid with at least four strands and write down the code that is repeated. In the braid complete the repeated section at least three times.
9. With the app KNOT, make a table of all links (this includes knots) with crossing number five or less.
10. In the table of knots, find the 2, q torus knots and the twist knots. Identify them by number. In the table of knots, we did not include products like the square knot and the granny. Which products would we have needed to include for a complete table up to eight crossings?
11. Tie the Borromean Rings, either with the app or with cord.
12. Make at least three complex patterns with the app. No directions, just make things you like.
13. Estimate the ropelength of the trefoil and the figure 8.
14. Arrange a closed loop unknot in such a way that it has at least eight crossings, rope, the app, or draw. Use Reidemeister moves to simplify it to a loop with no crossings. Include at least one intermediate picture.
15. Make a pattern with some symmetry or complexity on the app knoteverywhere.com. Share the pattern with someone — could be with someone in the class, but certainly doesn’t need to be. This is done by using the share button, which copies a description of the pattern to your clipboard. By pasting you can send that link via text or email or social media, etc. When they click on the image the app will open. Ask the person to add to the pattern or otherwise edit/change it and send it back to you. Include screen shots of both versions.
Project 4: Transformations
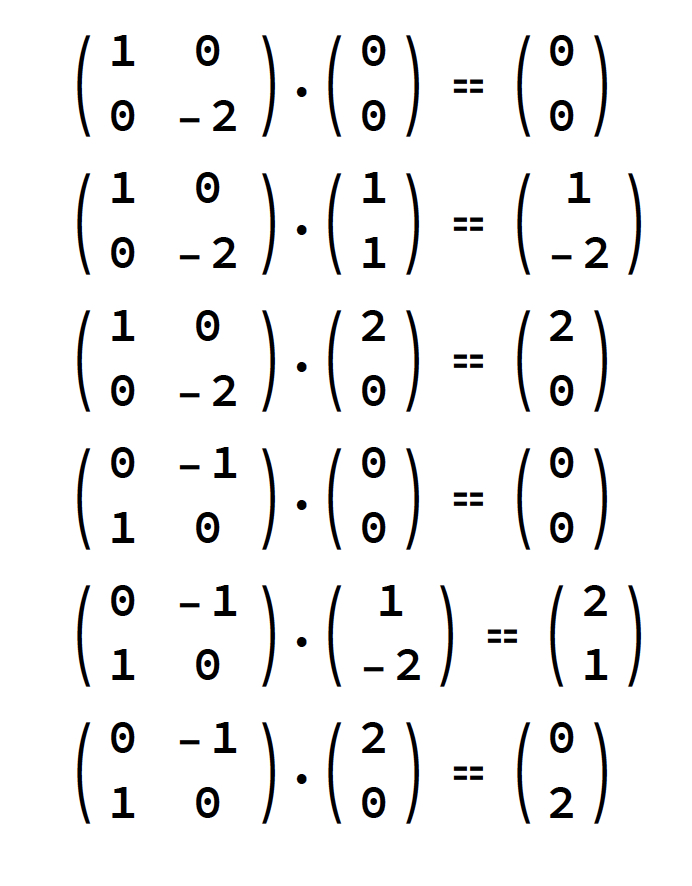
Consider a touch screen on a smart phone or tablet. You’ve seen apps where when you rotate the screen, the image rotates to keep the same orientation relative to your viewpoint. You’ve also probably used pinch moves to make an image larger or smaller, and used touch moves or buttons to rotate it. We would like to get at the mathematics of how this works a little. You can think of the image as a collection of points or dots in the two-dimensional plane. So they have x,y coordinates. When the image rotates or is shrunk or grown, the points end up in a new location. So that is the mathematics we need — one that moves points in the plane to new points in the plane. One way to do this is with matrix multiplication. Assume we have a point in the plane given by (x,y). Here is the rule for how we multiply it by a matrix.
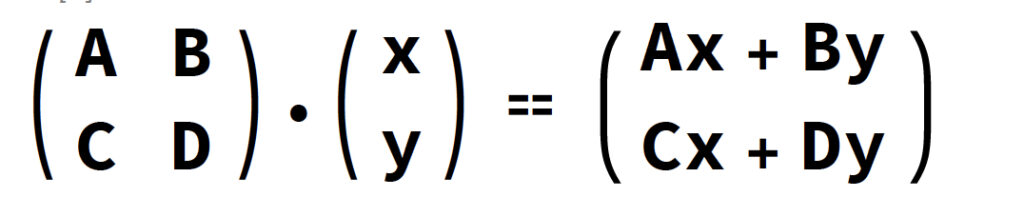
Here the point (x,y) is written as a column. So we begin at the point (x,y) and go to the point (Ax+By,Cx+Dy). The numbers A, B, C, D are called the entries in the 2 by 2 matrix. For example:
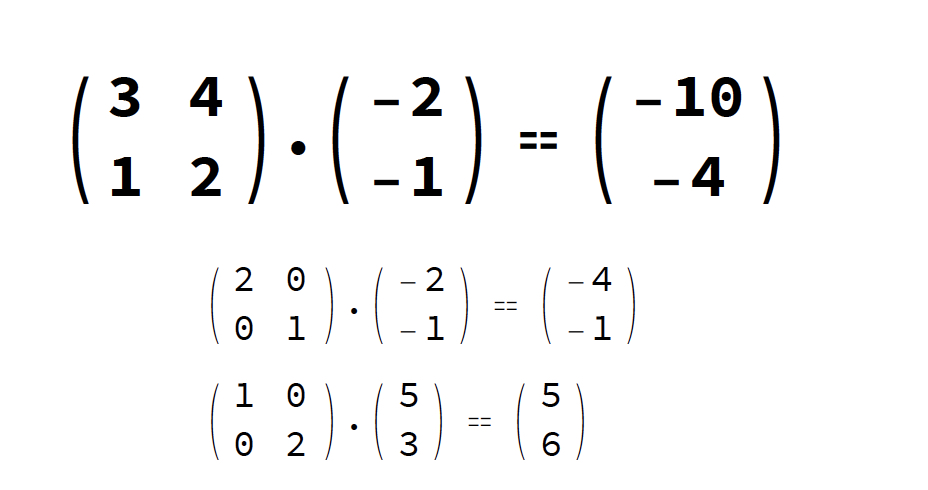
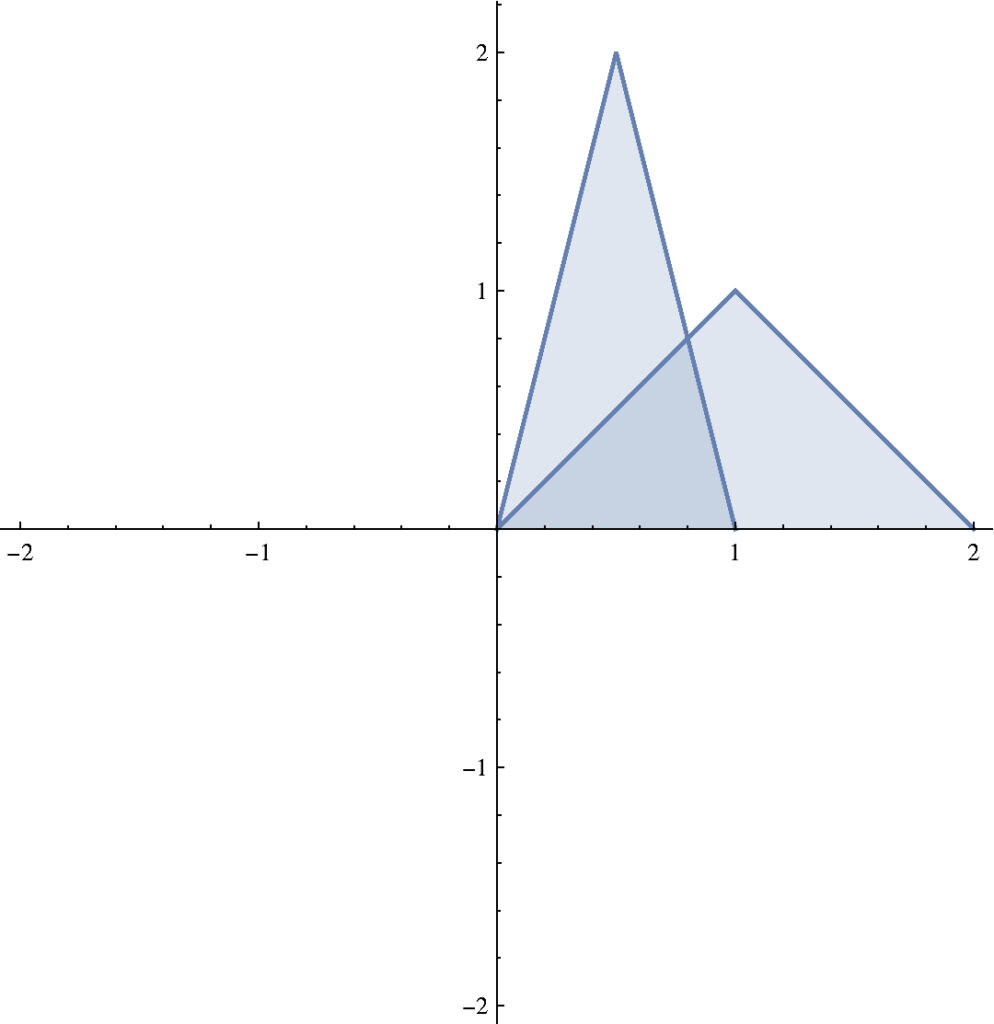
Check these to make sure you see how it works. Now the idea is that we take a shape, as defined by a set of points, and we multiply each point in the shape by the matrix, which gives us a new set set of points. And this new set gives us the new version of the shape. So say we start with the triangle given by (0,0),(1,1),(2,0).

And we multiply by a matrix:

This particular matrix stretches the shape in the x direction, but not the y. Another example:

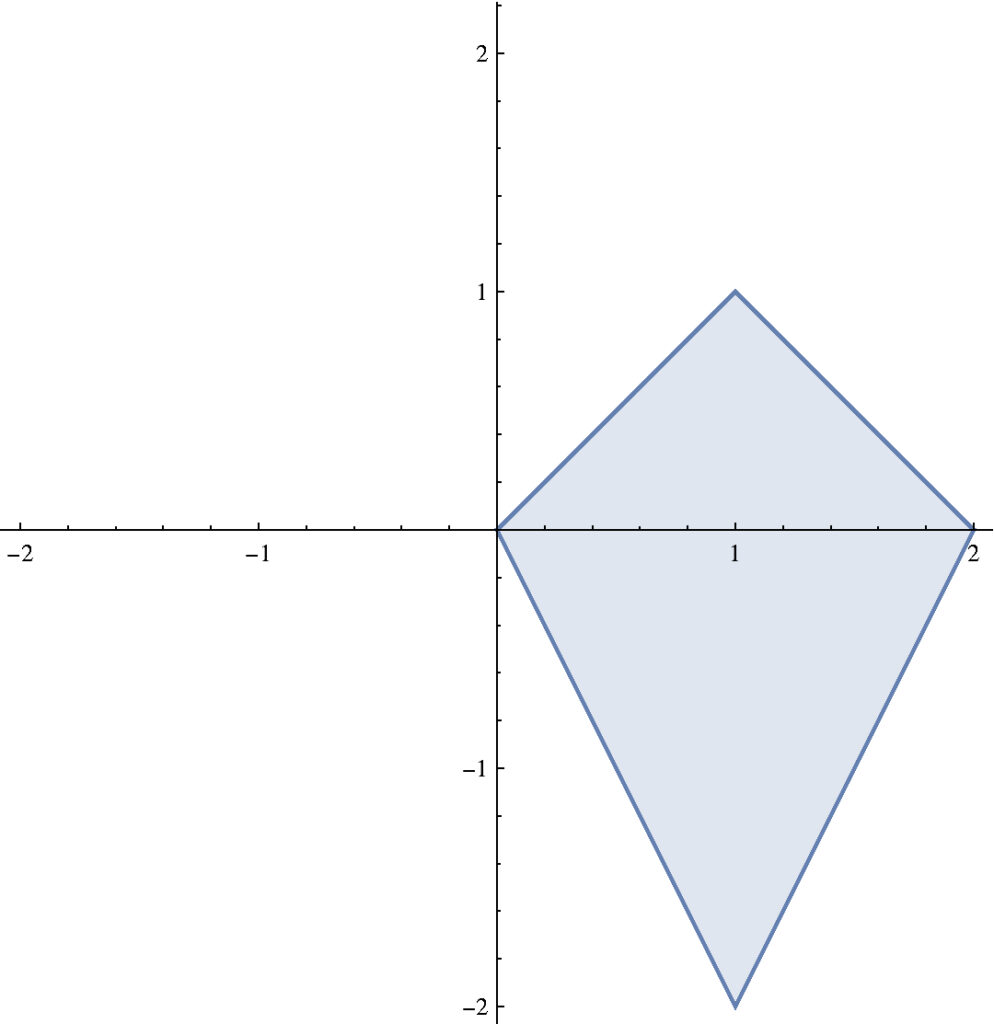
So this matrix flipped the triangle in the vertical direction (spun over the x axis), and stretched it in the y direction.
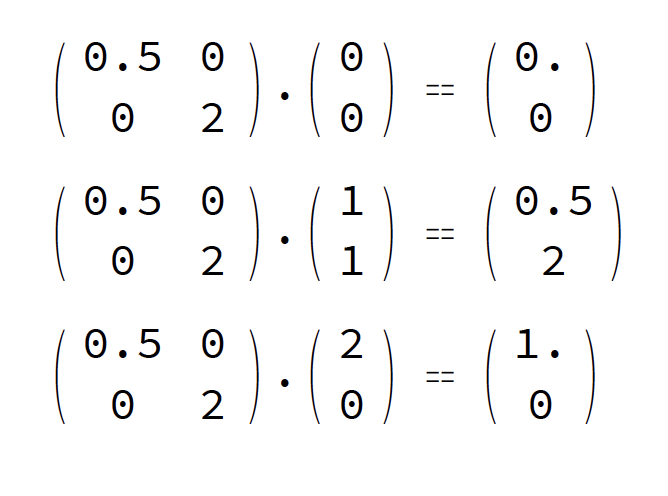
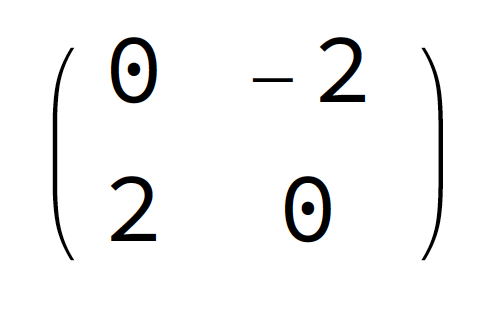
Here we shrunk in x and stretched in y. Next we consider rotations.

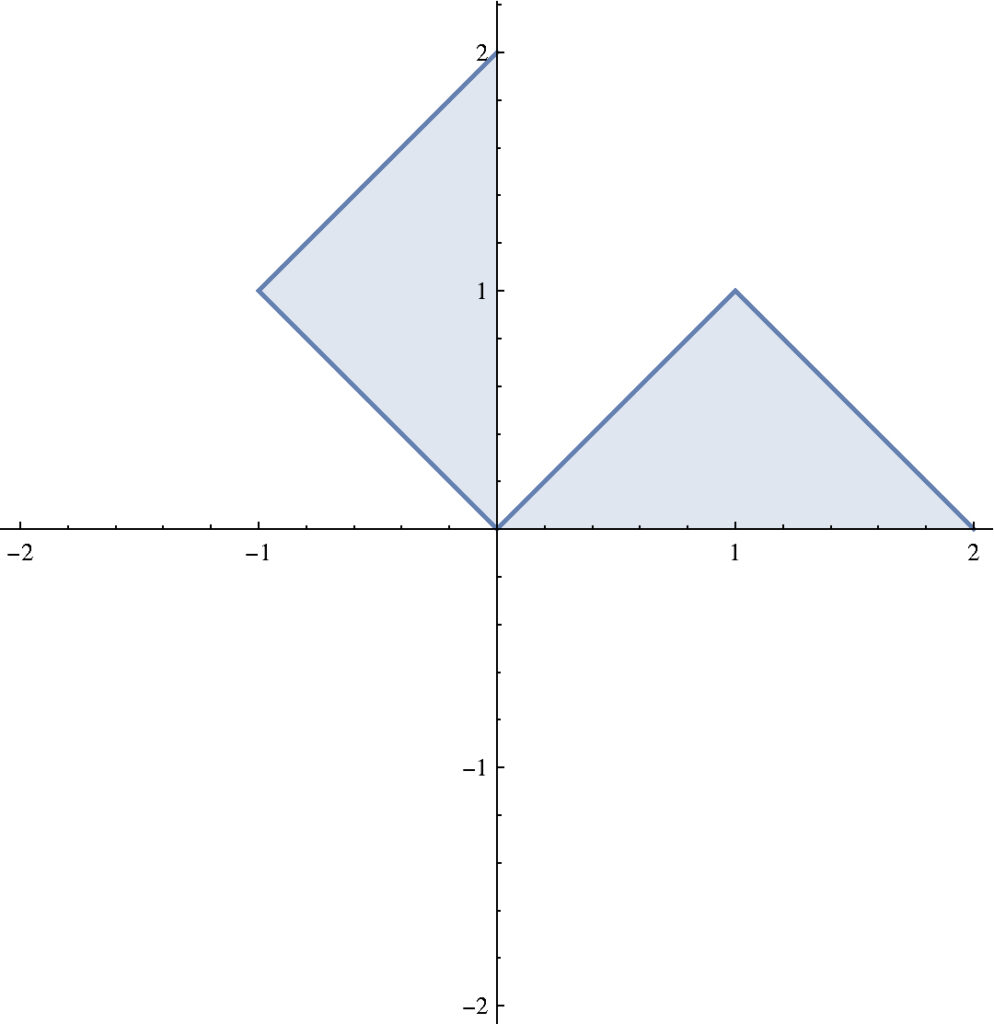
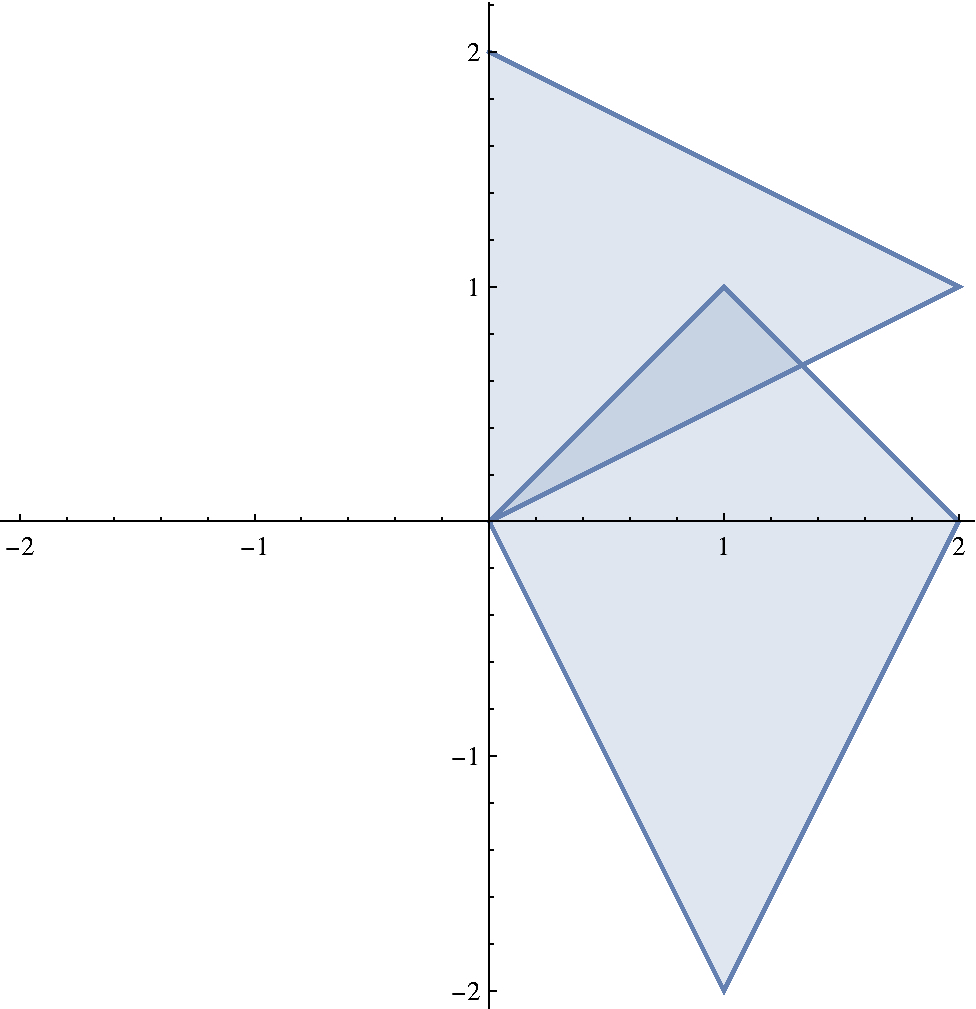
So this matrix rotated the shape 90 degrees in the counterclockwise direction, without any stretching or shrinking. In this next example we perform two operations: first flip and stretch, and then take the result of the flip and stretch and rotate it.
Another way to transform a shape is to preserve its shape and orientation, but move it. This is sometimes called translation. We do this by adding a vector (just another point) to each of the points in the shape. The key is to add the same vector to each of the points.
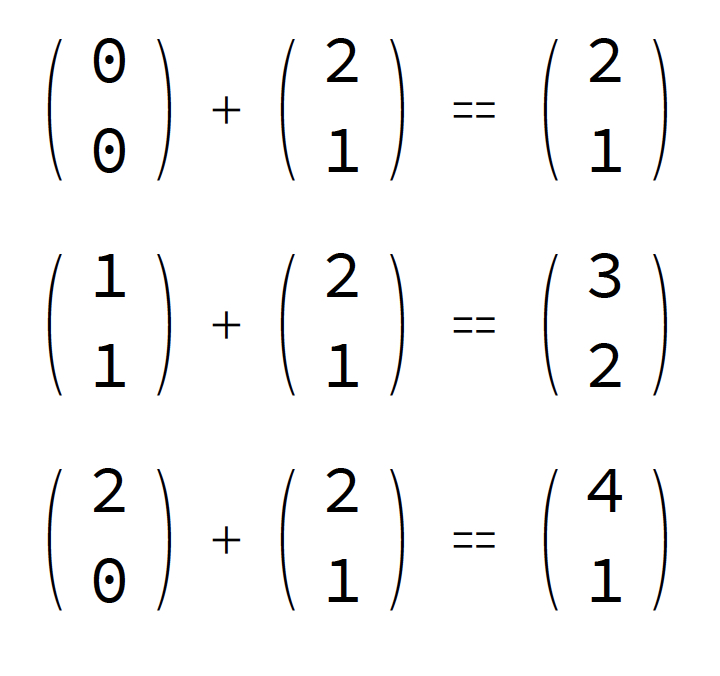

So adding the vector (2,1) to our triangle moved it to the right 2 and up 1.
Manifolds
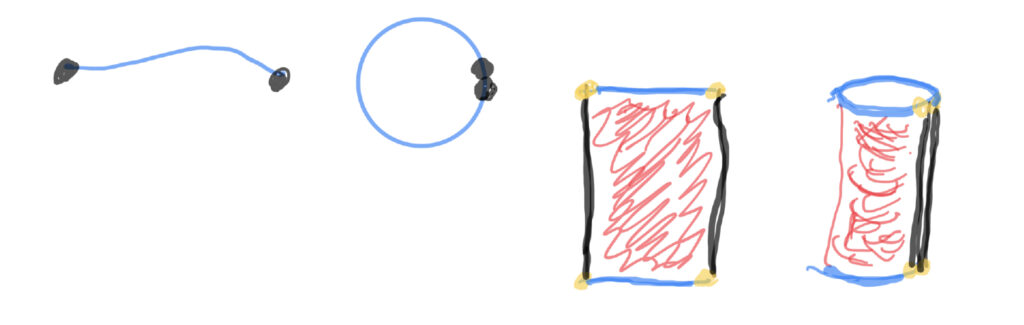
Two objects are topologically equivalent if one can be deformed to the other without tearing cutting or gluing — stretching and shrinking and warping every which way is just fine. Perhaps the simplest example is a closed loop in two or three dimensions. If it is not tied in a knot, then it can be deformed to a circle, so the loop and the circle are topologically equivalent.

Our basic question is: what are the different topological objects? We have one basic requirement of the objects. Locally, they should look the same everywhere. That is, they are made up of neighborhoods, and the neighborhoods are the simplest version of whichever dimension we have for the manifold. So, in one dimension, a neighborhood is simply a section of curve — without the endpoints.
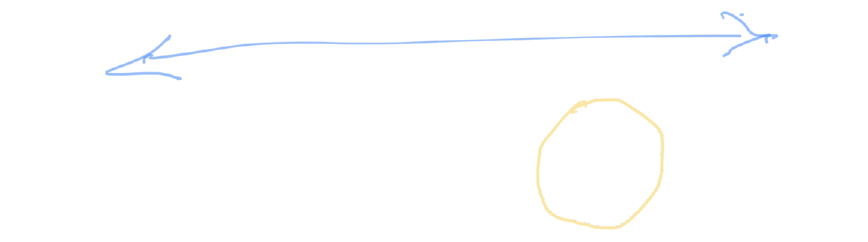
No crossings are allowed. As we said, manifolds look the same everywhere — sort of like malls. This leaves us with two possibilities in one dimension–the closed loop and the infinite line. And there is really only one question — if you go in one direction long enough, do you come back to where you started (closed loop) or not (infinite line). The closed loop is a closed manifold, the infinite line is open.
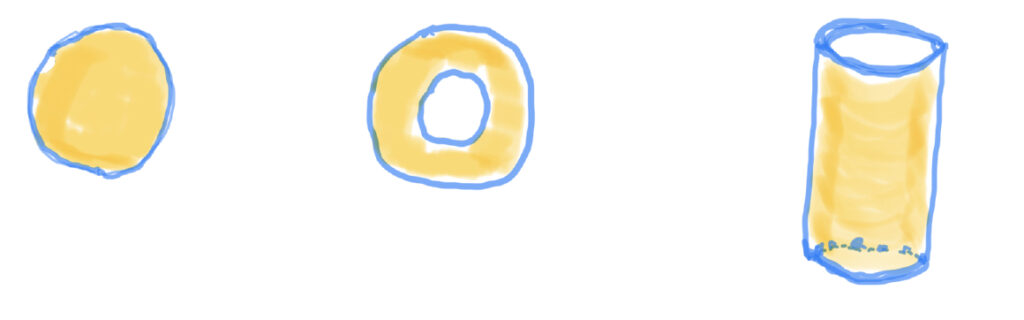
In two dimensions the situation is much more interesting. The neighborhoods look like little sections of surface, but there are now more ways for for them to connect. Two examples of closed manifolds are the sphere (beach ball) and the torus (inner tube). One open two dimensional manifold is the infinite plane, another is the infinite cylinder.
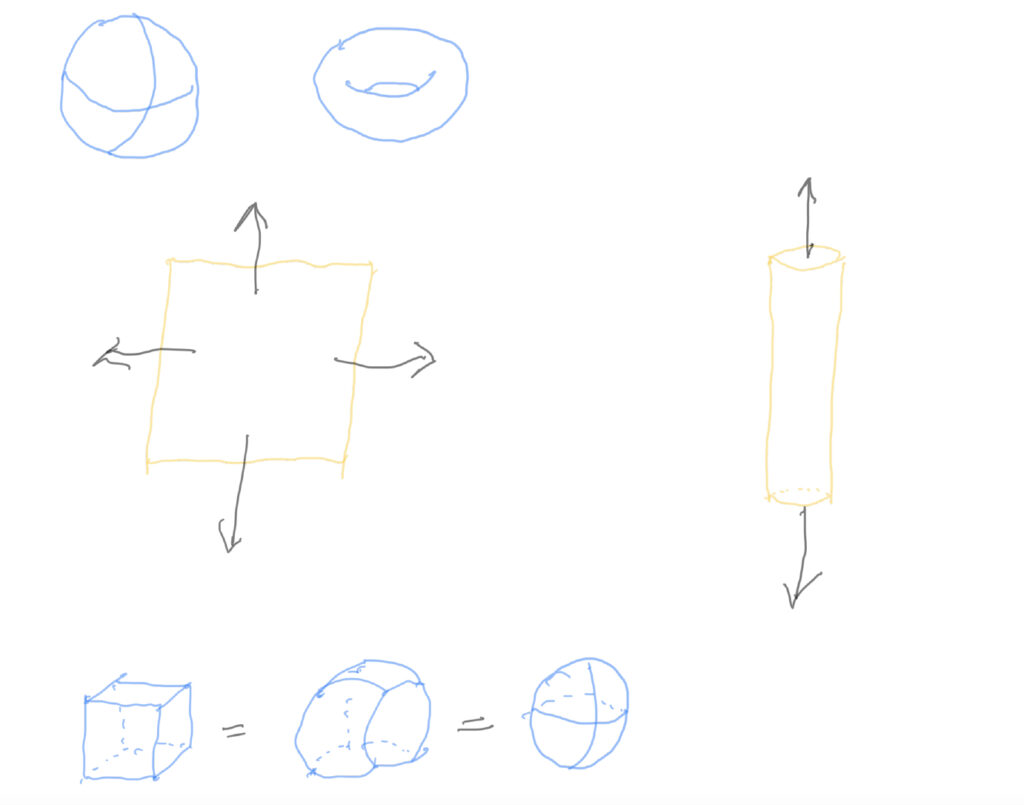
The surface of a cube is topologically equivalent to the sphere, so we call them the same manifold, but we might guess that the sphere and the torus are not equivalent, and that guess would be correct.
Manifolds with Boundary
Another type of manifold are the ones where we allow two types of neighborhoods, the ones described above, and ones with edges or borders. These edges or borders are of one dimension less than the basic neighborhood. The collection of all the borders of the neighborhoods is the boundary of the manifold, and must itself be a manifold of one dimension less than the manifold in question. A simple example is the disk, which is a 2D manifold with a 1D boundary — a circle. Another example is the annulus, a disk with a hole cut in the middle. So this is a 2D manifold with two 1D boundaries, the outside circle and the inside circle. Can you see that the annulus is topologically equivalent to the finite cylinder? Try looking down the cylinder–say the cardboard tube from the center of a paper towel roll. Forget the depth information, and you will realize you are looking at an annulus.
Cutting and Pasting
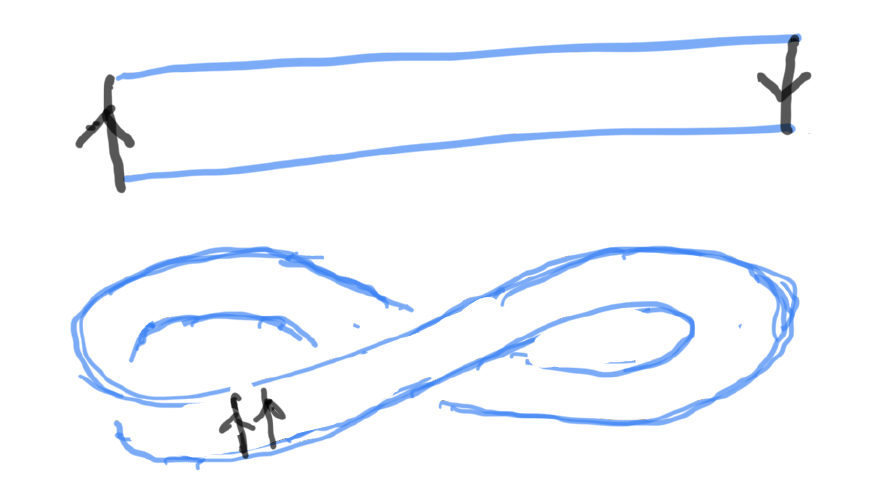
One way of creating manifolds is to take regions with boundaries and join or paste these boundaries together. For example you could take a line segment — a 1D manifold with two points for boundary, and join those two points, making a topological circle. Similarly, you can take a sheet of paper, join two opposite edges, and you have made a finite cylinder. We know a finite cylinder has two boundaries.
Next try cutting a strip of paper, then join along the short sides, after first giving the strip a half twist. How many boundaries now? Should be one — the half-twist changes things quite a bit from the cylinder. In fact this new surface has only one side — try tracing along it — you will realize that the top and bottom are the same side, and you go around twice to return to the spot you where you began. This manifold is called the mobius strip. It is kind of a curiosity, but also had at least one practical application — in the days when many machines were driven by belts, the belts were sewn with a half twist so as to wear the entire belt evenly (not just one side).
Discrete Manifold Constructions
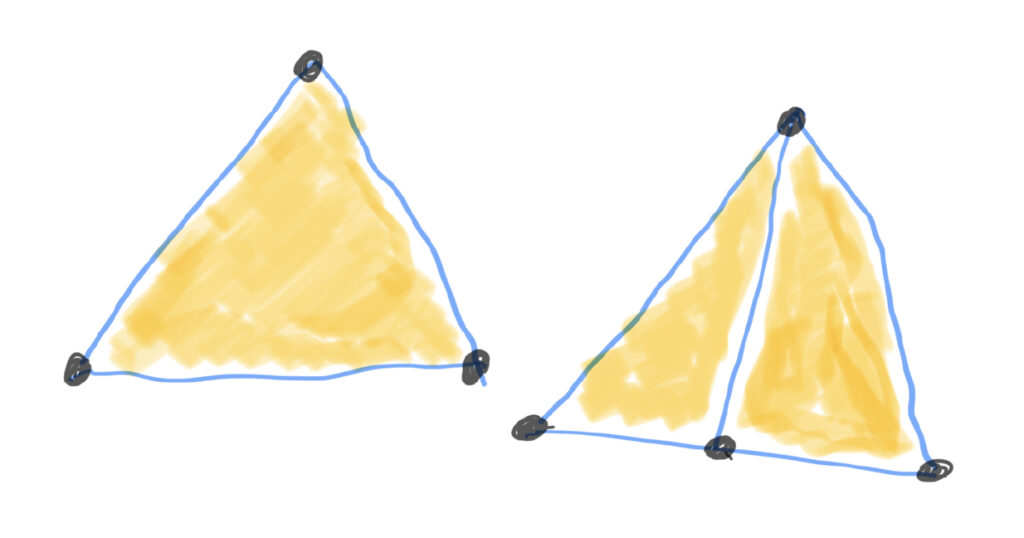
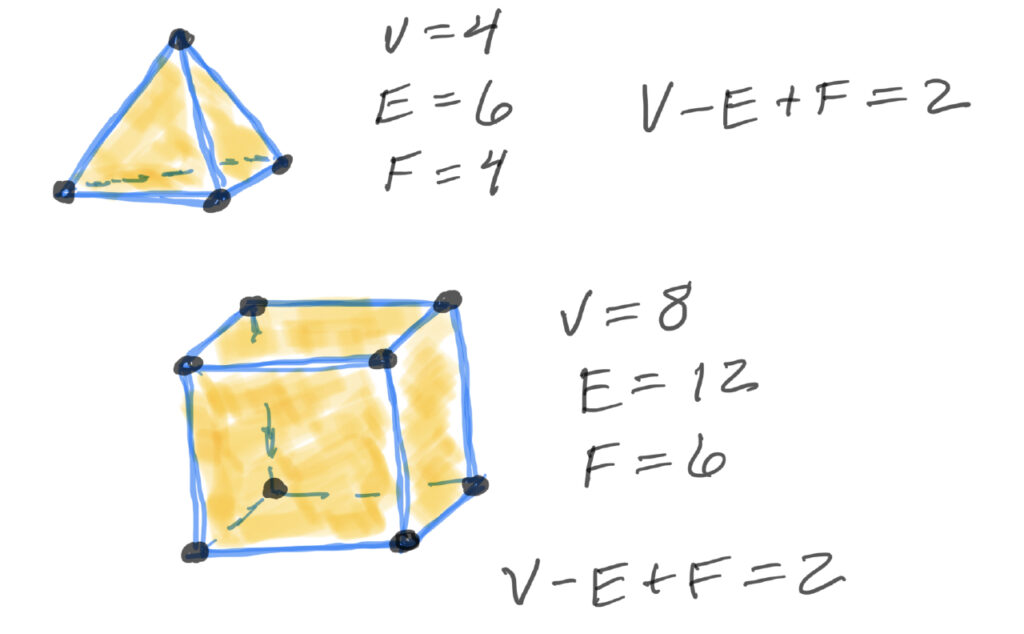
We saw in Project 2 that we could build 3D shapes out of tiles that were regular polygons. As a manifold, the tile is a section of plane, with the regular polygon as a boundary. In general, we can build manifolds using mathematical materials. We can call them discrete models because we use a finite number of simple pieces. We can use points — we’ll call them vertices, sections of line — call them edges, and sections of plane — call them faces. Edges end in vertices, and faces have edges as their boundaries. So if we consider one of our equilateral triangle tiles, it has 3 vertices, 3 edges, and 1 face. Let’s say the we split it in half by adding more a new edge running from the top peak straight down to the base. We now have 2 faces, 4 vertices (we had to add another vertex where the new edge met the base), and 5 edges (the base was split in half by the new vertex so is now two edges).
The Euler formula gives a number that helps us distinguish between topological manifolds. That is, if two manifolds have different Euler characteristics, they cannot be the same manifold. Let V be the number of vertices, E the number of edges, and F the number of faces. Then the formula is: V-E+F We can apply it to a simple polygon like a triangle or a square — just the polygon, no face.
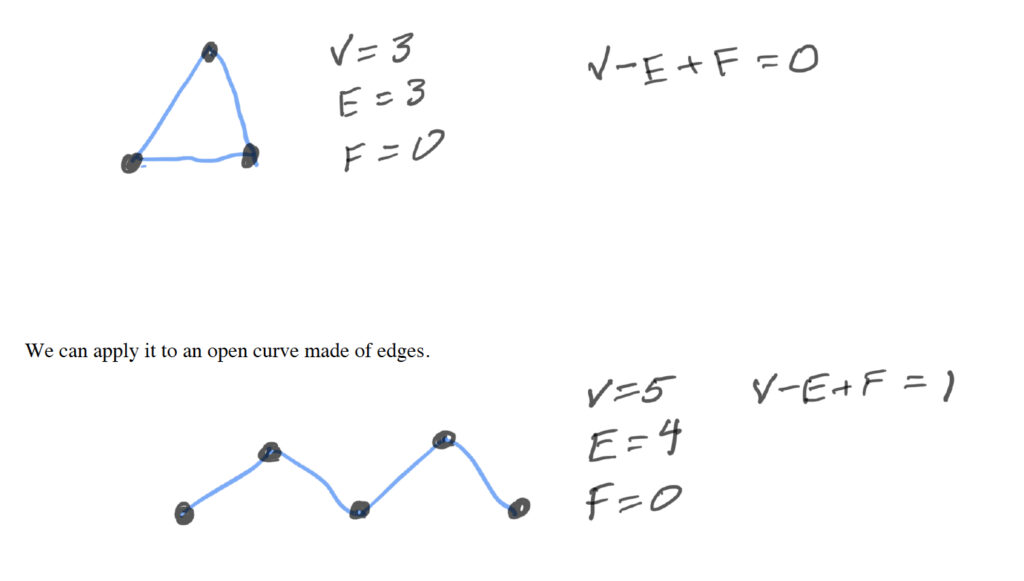
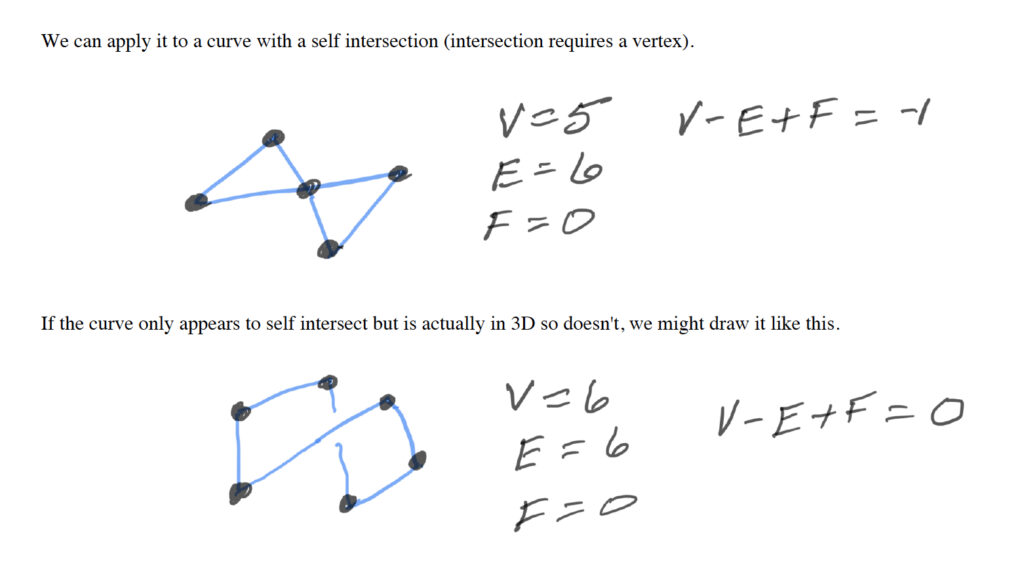
So we might guess that the formula gives us 0 when the object is a simple closed curve. Now if we add faces we might consider a triangle and a square.
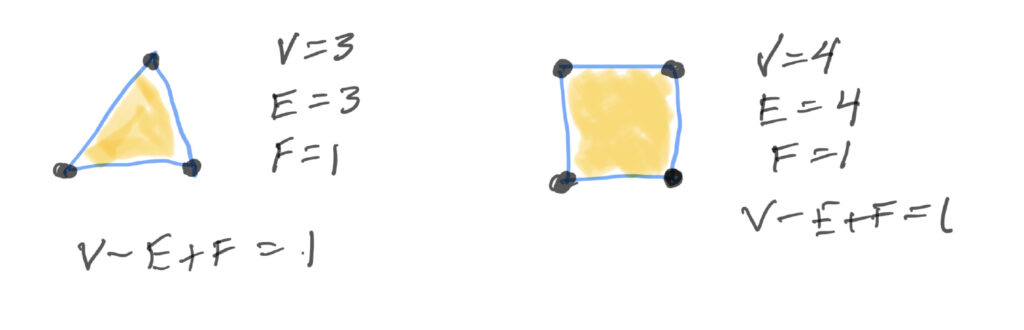
The rule is that a face cannot have a hole in it. So this would not be an accepted construction.
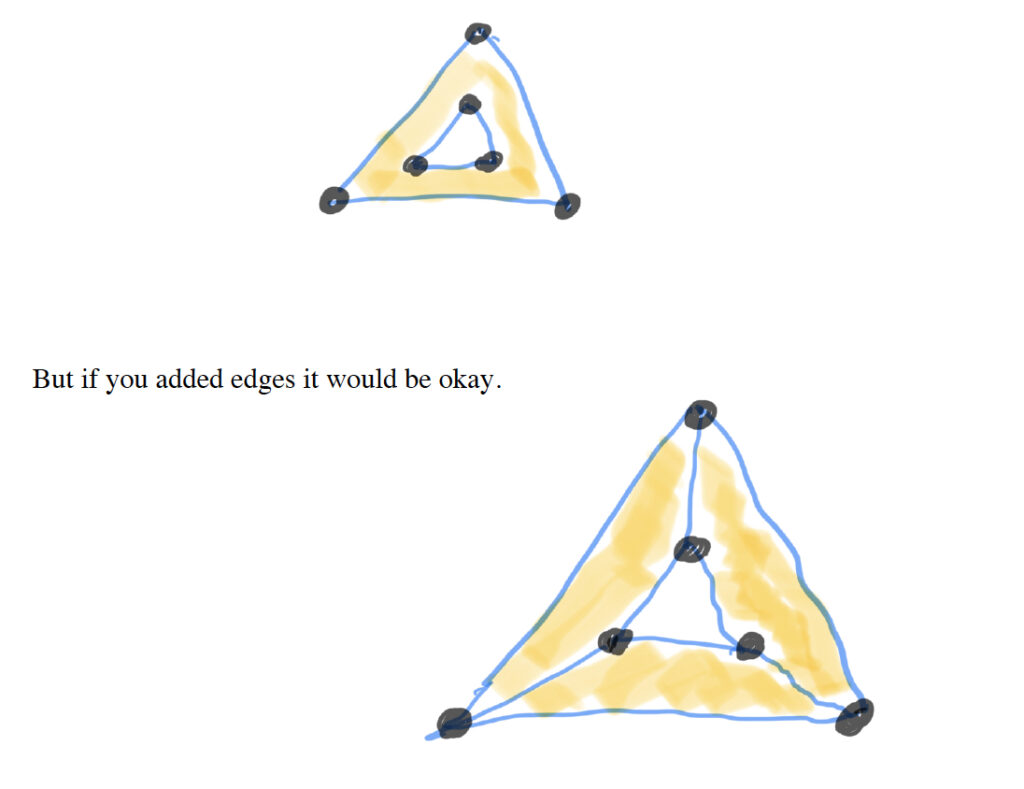
The polygon with a face without a hole is called a topological disk, the one with a hole is called an annulus. We can build 3D shapes. For example a tetrahedron and a cube are both topological spheres, meaning they have an inside and an outside. You might imagine that they could be beach balls that you blow up until they look like a sphere. Note that any shape that is a topological sphere must have the same value for the Euler formula.
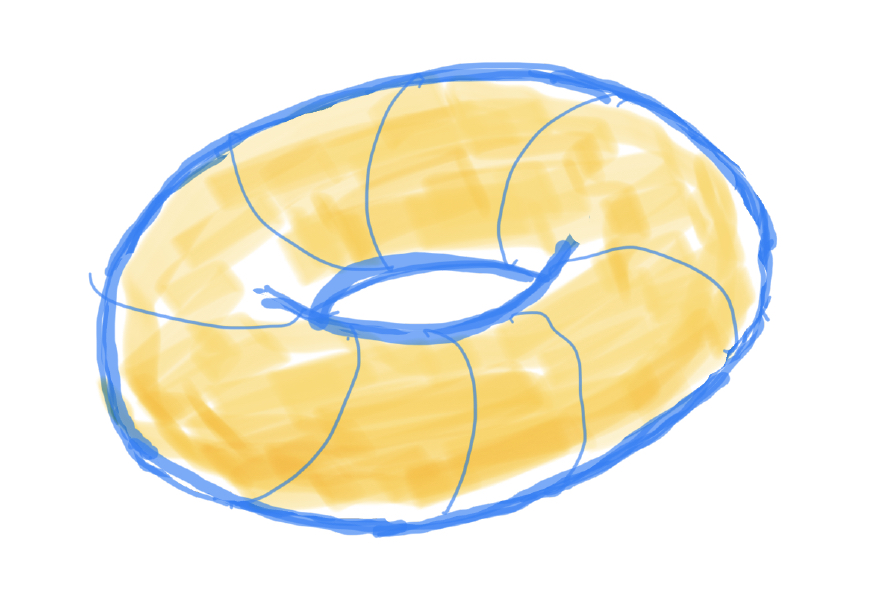
The torus is a shape that is a surface that also has an inside and an outside — think of a donut or an inner tube — but is different from a sphere because it has a sort of 3D hole in it.
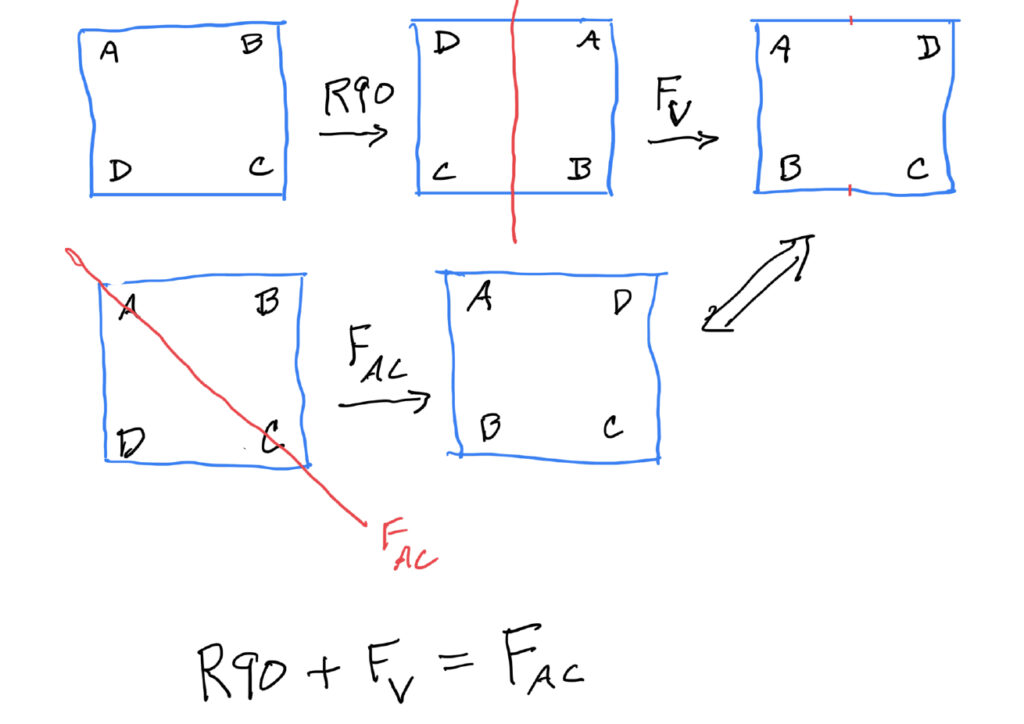
Symmetries
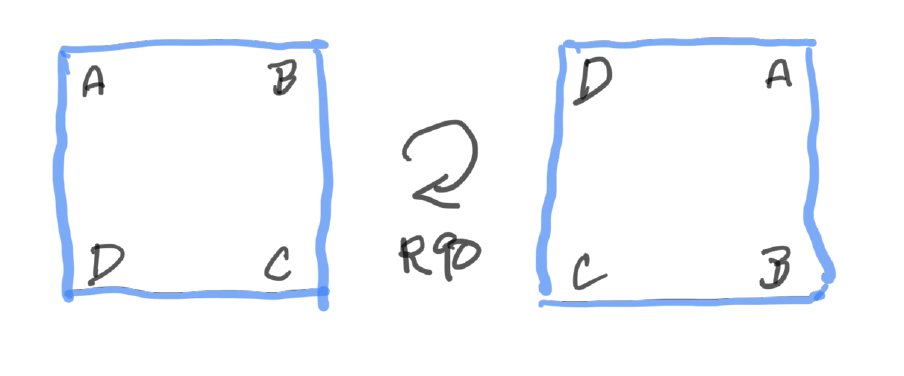
There are various kinds of symmetries — rotational, left/right, horizontal, vertical, reflection — these are just some of the names you will see. We will try to give some mathematical basis for these by looking at the symmetry groups of the regular polygons we have studied. A symmetry move is a movement of the object such that after the move the object appears just like it did before the move. Consider a square. We could rotate it 45 degrees, but then it will look like a diamond, so this is not a symmetry move. However, if we rotate it by 90 degrees, it appears as it did. We can do one 90 degree rotation, followed by another, to get a 180 degree rotation. If we let R denote a right hand rotation, we might write this as R90 + R90 = R180. Let L denote left hand rotation. Then we can write R90 + R90 + R90 = L90. We might also write L180 + L180 = 0, since these two moves leave us in the original position.
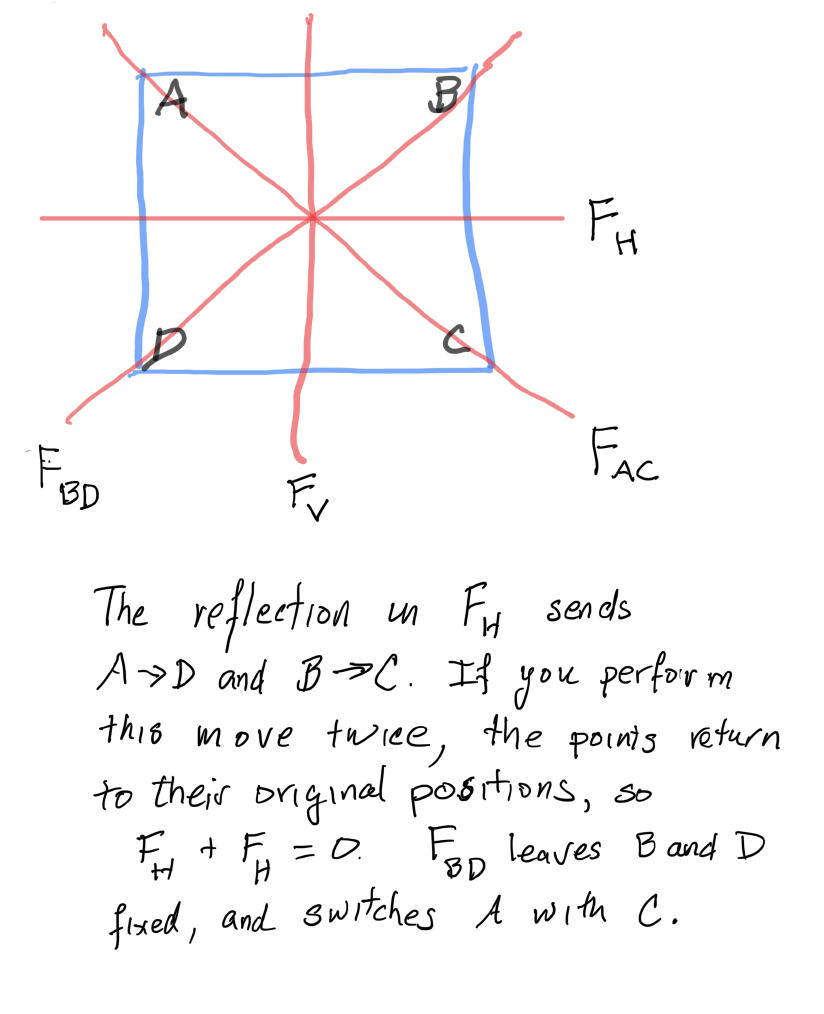
There are other symmetry moves for the square. One way to think about them is that they are reflections across lines — think of the lines as sort like mirrors — what is on the left is now on the right, or with a different reflection what was on the top is now on the bottom, and so on. Here we show possible lines of reflection for the square.
Project 4 Problems:
Transformations:
Note, when you perform some of these transformations, you can do on paper with a pen or pencil. You could use graph paper to make the drawings. But it might be just as easy to make a grid yourself — you will probably only need a few equally spaced (vertically and horizontally) lines.
1. Pick a shape — it can really be any shape made by connecting dots. Don’t use the shape I did.
2. Stretch it in some direction using matrix multiplication. Don’t use the matrix I did. Draw the original shape and the stretched version together on the same grid.
3. Figure out which matrix will rotate it in the clockwise direction. (I did counterclockwise above). Do the rotation and draw the original shape and the rotated version together on the same grid.
4. Do a translation, then a rotation on the translated shape. Then reverse the order — do the same rotation first, then the same translation. Do you get the same result? Why or why not?
5. What does multiplying by this matrix do? Explain why.
6. Pick any non -zero numbers for A, B, C, D — make your own matrix. What does it do to your shape? Any idea why?
7. Make a simple face out of a few polygons — for example triangles for eyes, etc. So the face is made of lines connecting points, and you have the locations of the points. Transform the face — stretch or compress or otherwise distort it using a matrix. You are welcome to use graph paper for this one.
Symmetries and Manifolds:
8. Build a mobius strip as described.
9. Now take another strip, and give it two half twists (one full twist) before joining the edges. What is the result? How many boundaries? What do you think will happen with 3 half twists, and 4, and so on?
10. Draw a center line in the long direction on a strip. Form a mobius band, then cut all the way along the line. What is the result? What if you do the same thing for a strip that you gave two half twists to before joining?
11. Give a discrete example of a simple closed curve that is not mentioned above and compute its Euler characteristic.
12. Give two discrete examples of topological spheres not mentioned above, and compute their Euler characteristics.
13. Build a discrete model of a torus and compute the Euler characteristic.
14. Describe the symmetry group of the pentagon. Make a pentagon, label the vertices. Use it to list the symmetry moves.
15. Write two symmetry equations for the square. Write a symmetry equation for the pentagon that includes at least one rotation and one reflection.
16. Can you describe the symmetry group of the 3D cube? (Give it a shot…..)
Project 5: Functions and Graphs
In this project we will connect some of our earlier shape studies (for example straight lines, circles and ellipses), with the ideas of transformation. One way to do this is through equations for the shapes. For example, if we consider a circle centered at the origin (0,0) of radius r, the equation is
$$x^2 + y^2 = r^2$$
So if r=2, this is
$$x^2 + y^2 = 4$$
The points on the circle are the ones that satisfy the equation. For example, if x=2 and y=0, the equation holds: put 2 in for x and 0 in for y, and you get 4=4, which last I checked is true. When we drew the circles with string, the length of the loop holding the pen for this circle would be 4 (twice the radius since the string went from the pin to the pen and back again). To move the circle to the LEFT by 3, we use the equation:
$$(x+3)^2+y^2=4$$
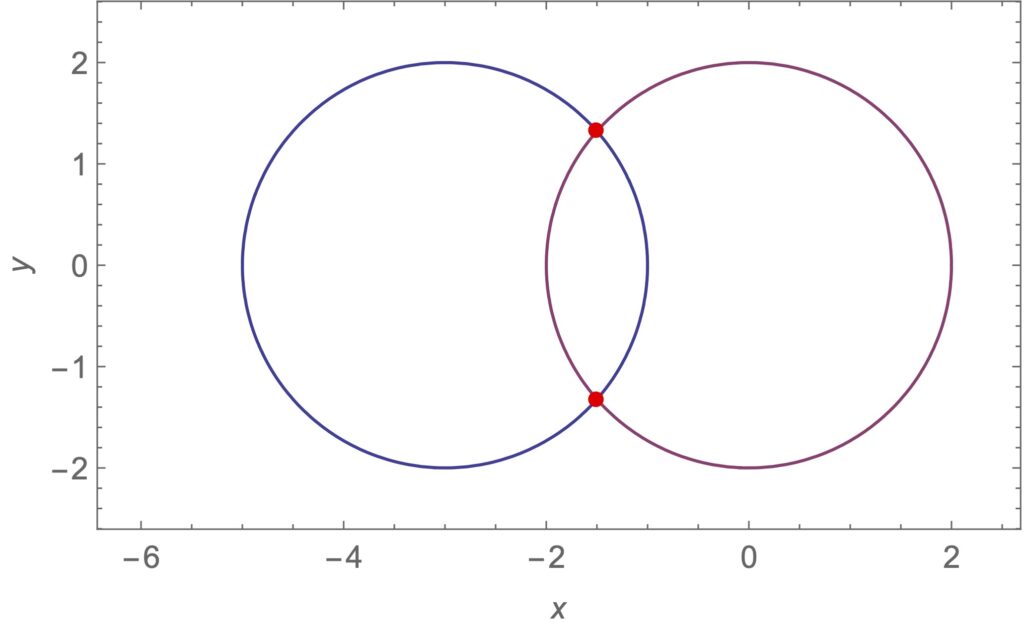
Moving in y is similar — let’s move the circle to the right 1 and up 2:
$$(x-1)^2+(y-2)^2=4$$
The story is similar for ellipses. The equation for an ellipse centered at the origin is
$$x^2/a^2 + y^2/b^2 = r^2$$
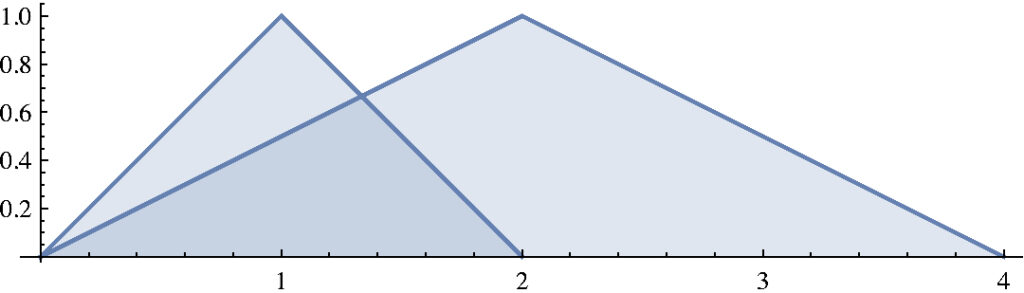
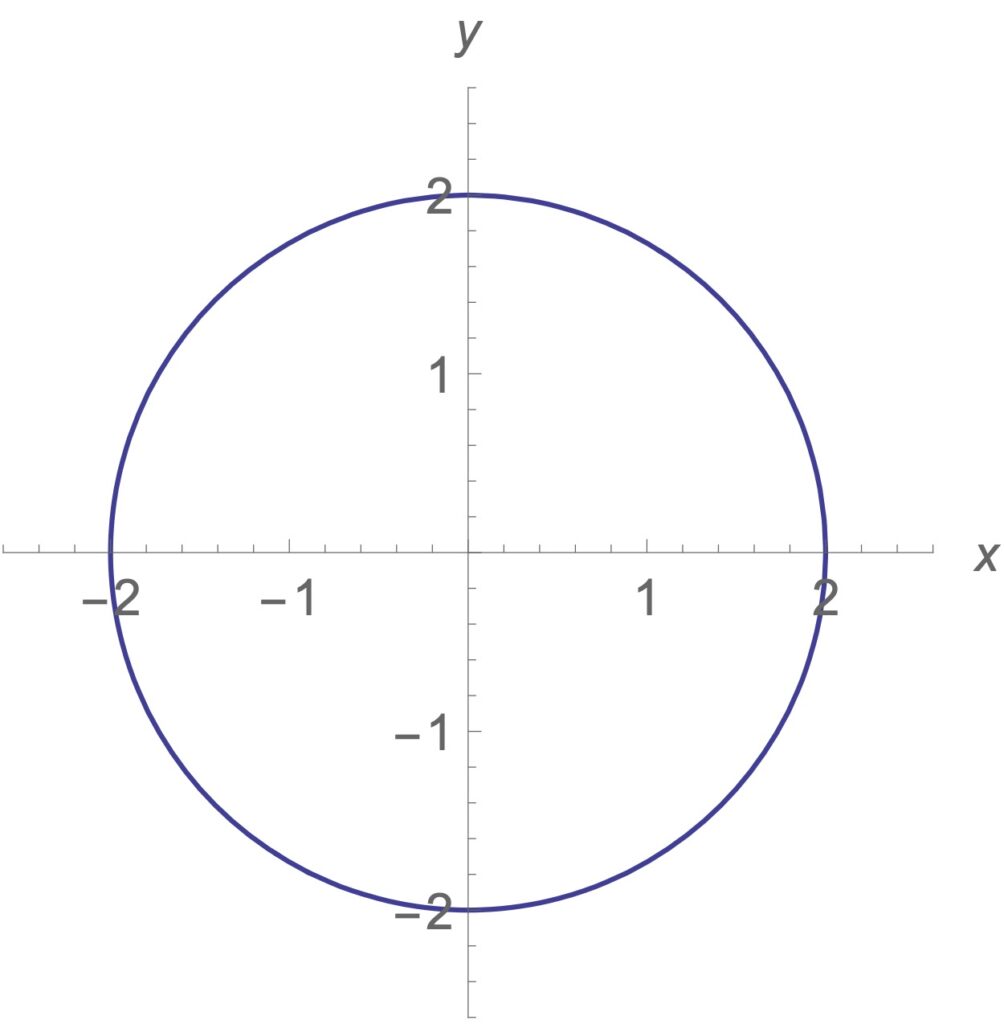
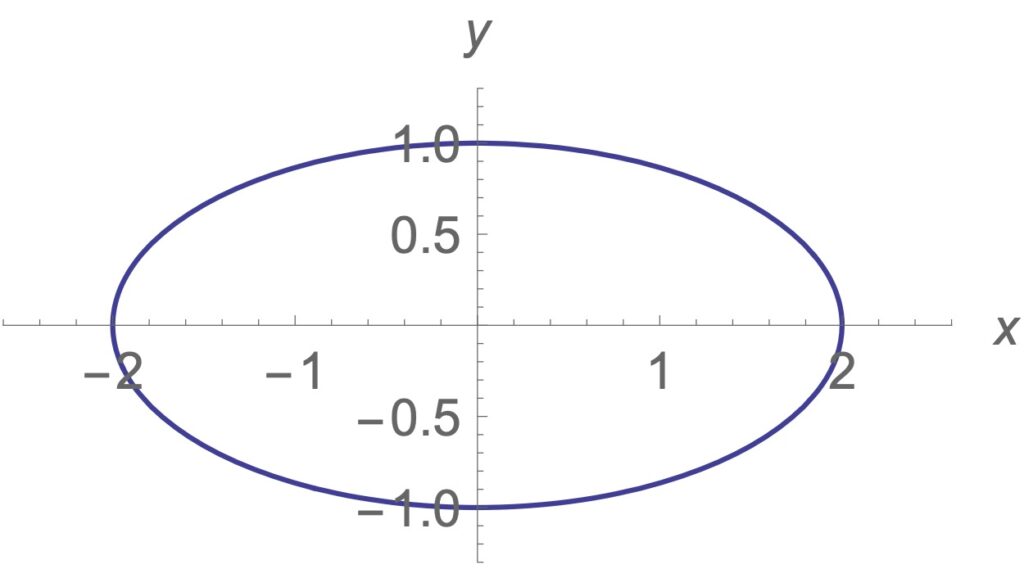
The a and b stretch or compress the circle to make it an ellipse. For example let a=1, b=2, r=1.
$$x^2 + y^2/4 = 1$$

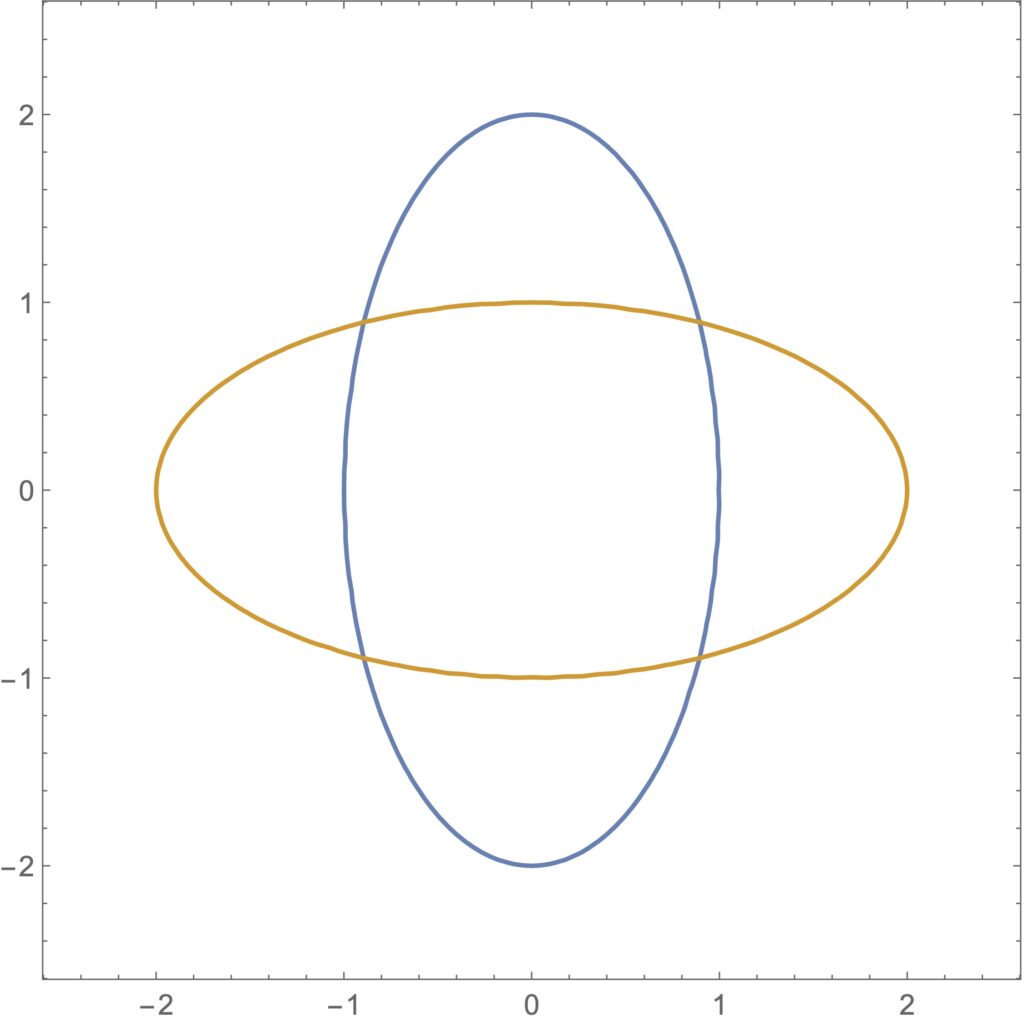
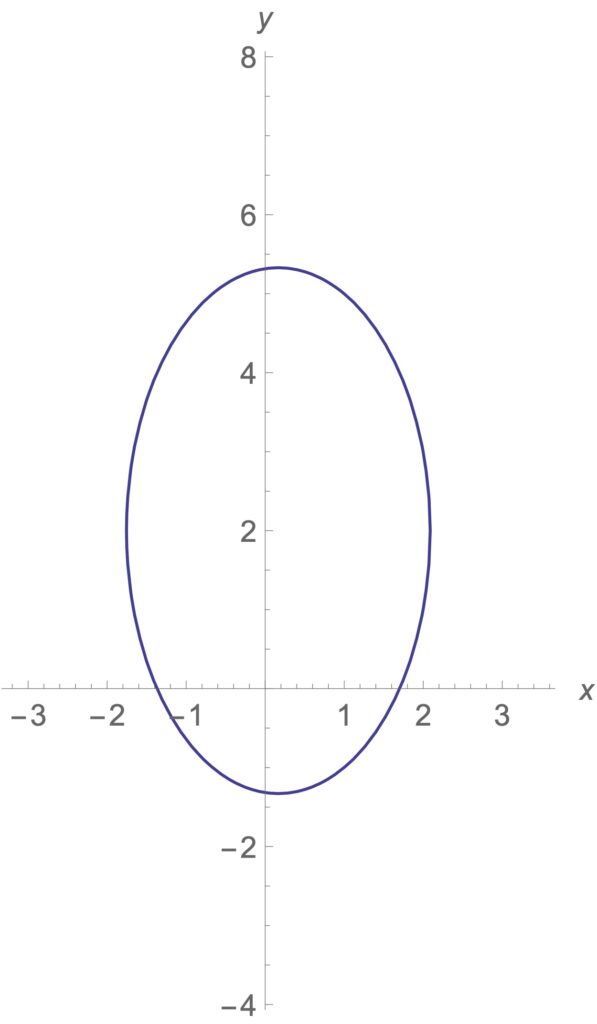
We can rotate it by switching the x and y divisors:
$$x^2/4+y^2=1$$
Here is both of them plotted together.
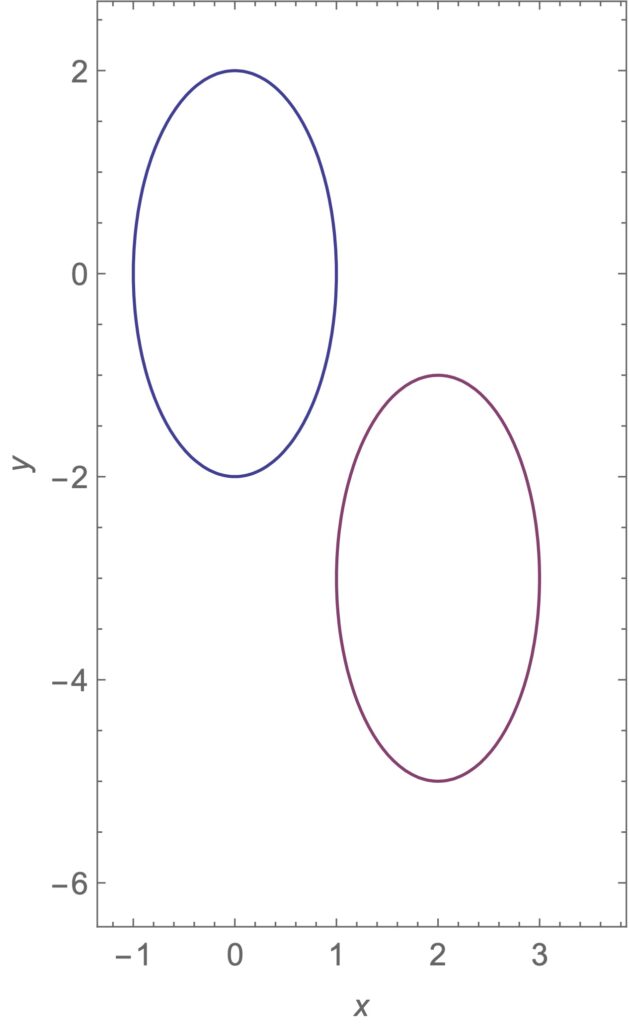
We can translate the ellipse as we did the circle. We’ll move it to right 2 and down 3.
$$x^2+y^2/4=1,(x-2)^2+1/4 (y+3)^2=1$$
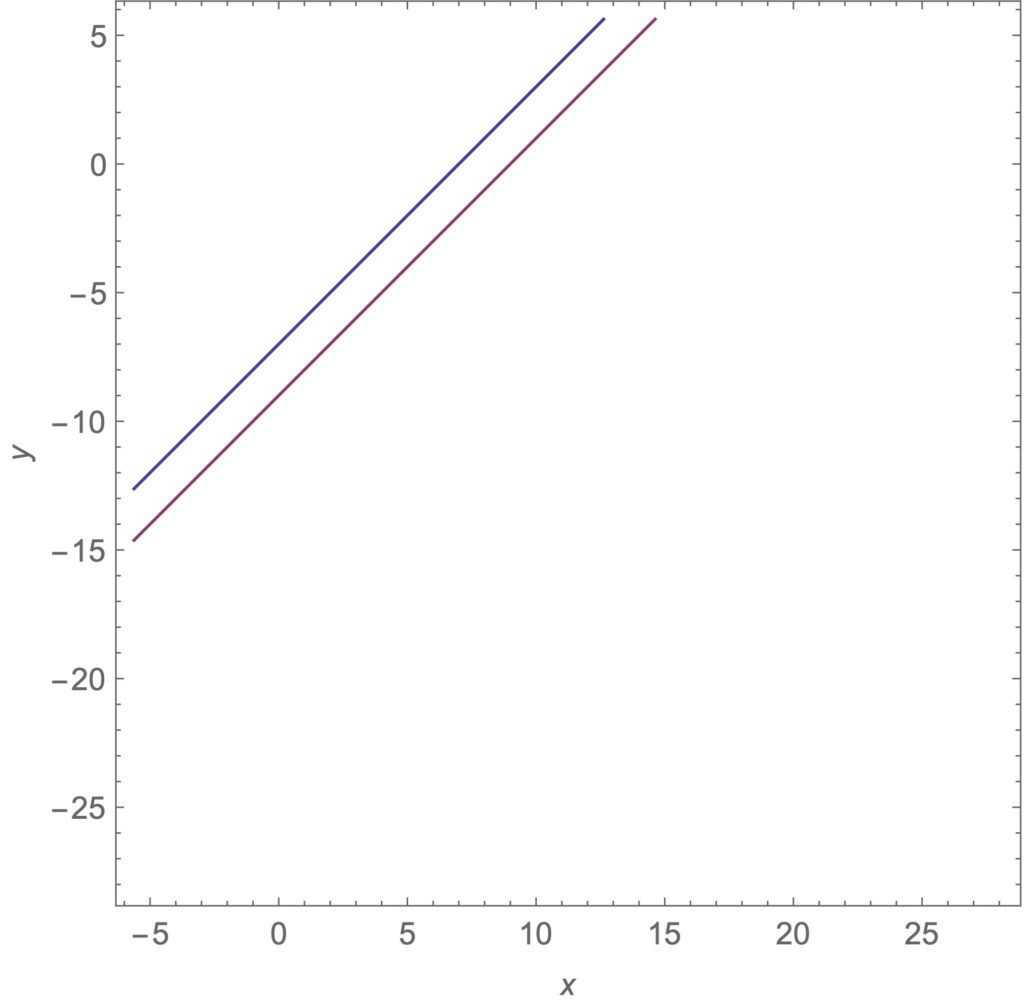
Straight lines have equations without the square exponents.
$$3 x+2 y=4,x-y=7,y=2 x+1$$
We can translate a line by adding or subtracting to a variable as we did with the circles:
$$x-y=7,(x-2)-y=7$$
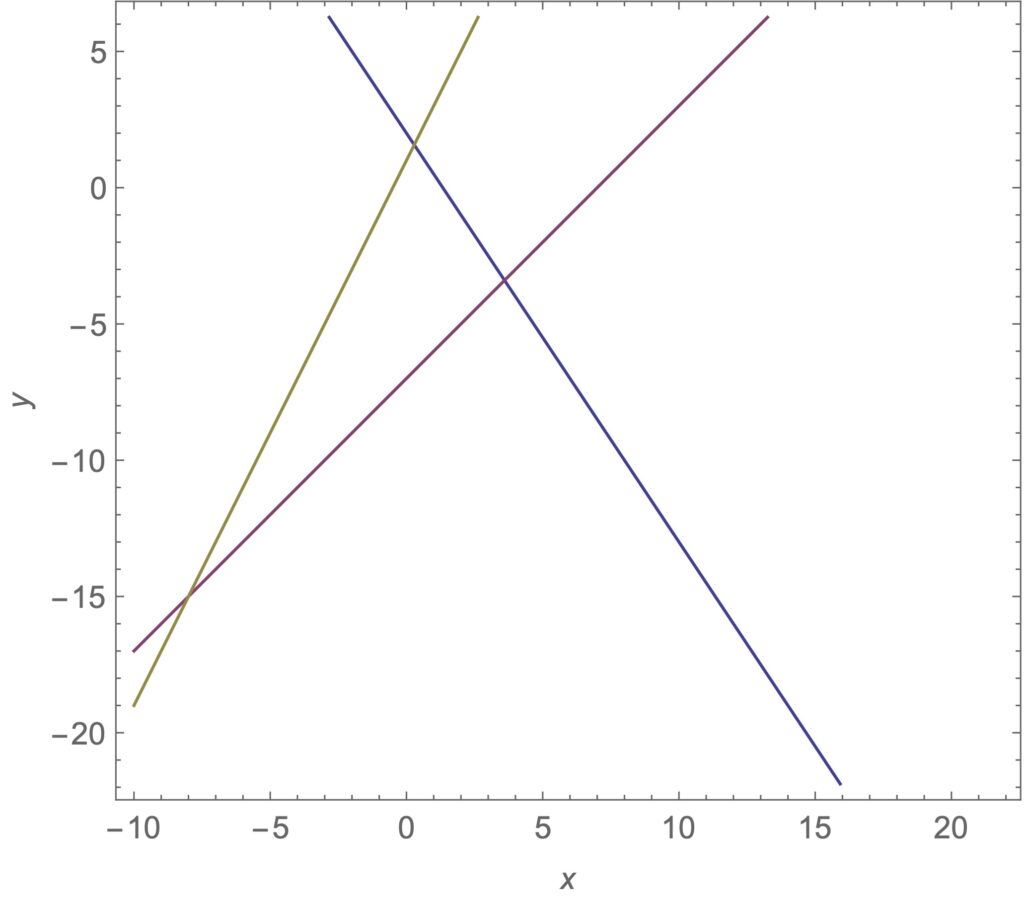
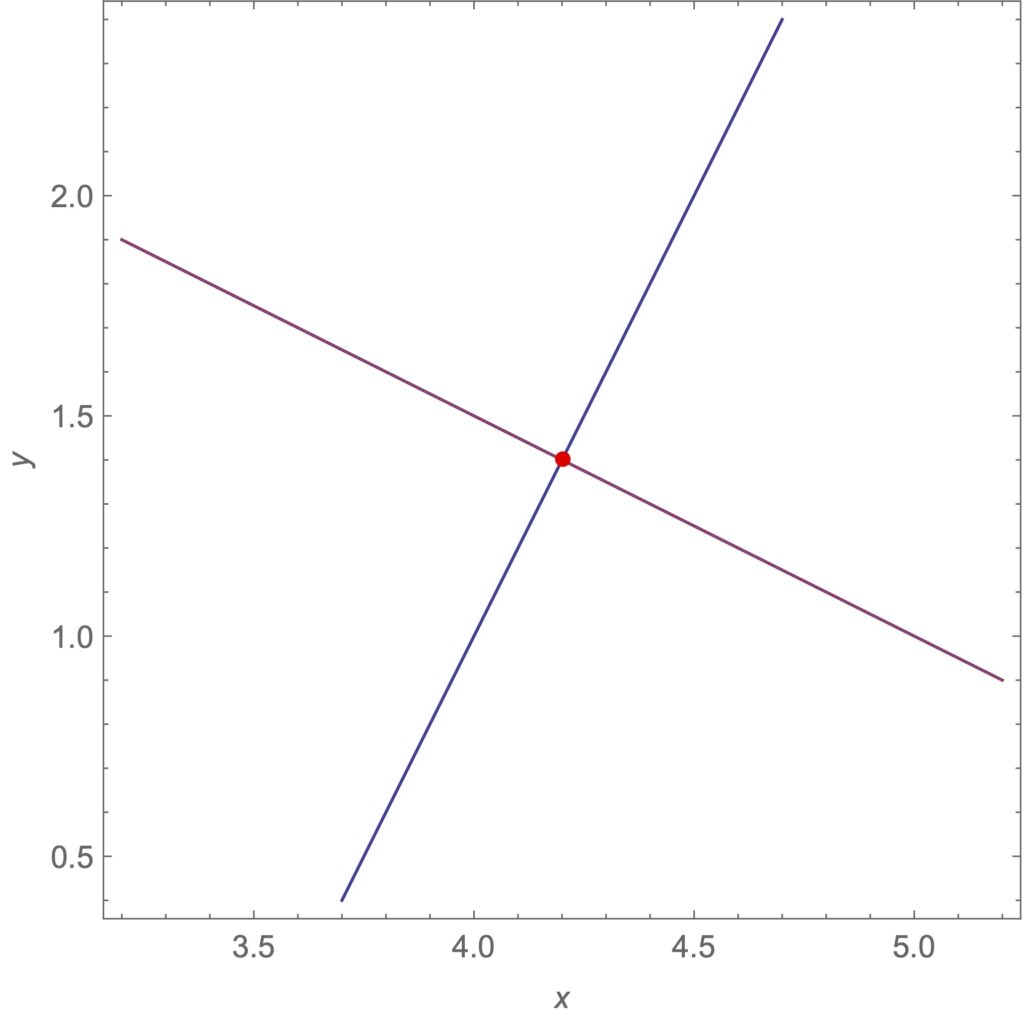
We can rotate a graph by switching x and y and changing a sign.
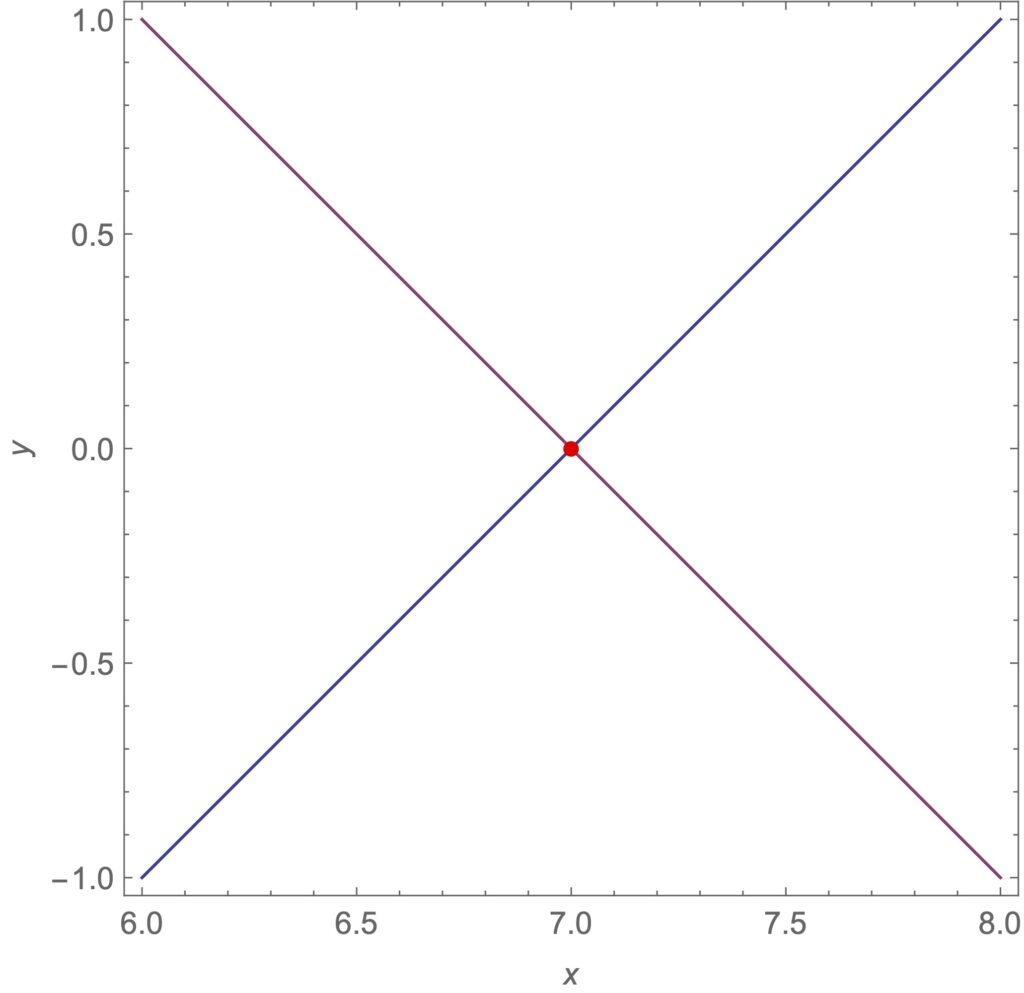
$$2 x-y=7,2 y+x=7$$
If only one of x or y is squared, we get a shape known as a parabola:
$$y=x^2,x=y^2$$
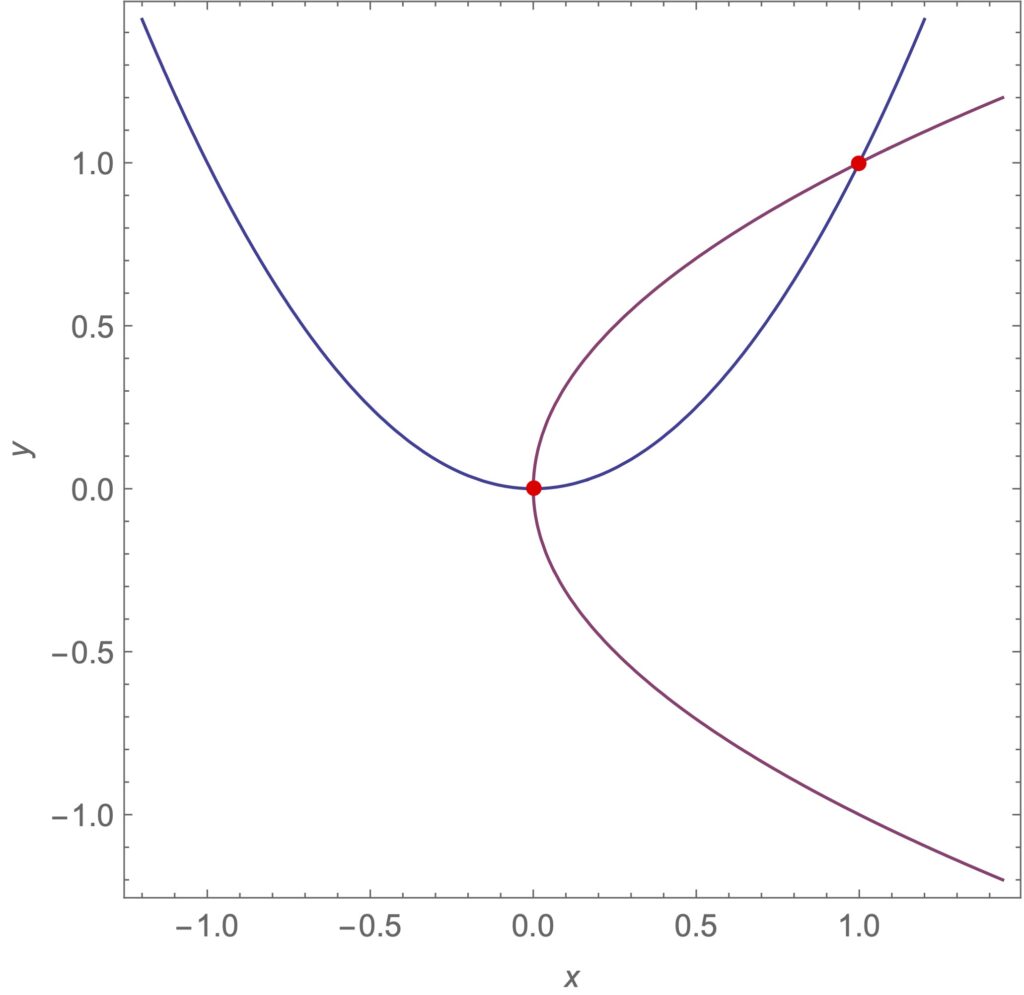
This shape sort of makes sense from the equation — sort of a combination of a line in one direction with a circle in the other. We can, of course, translate (up 1 to the LEFT 2):
$$y=x^2,y-1=(x+2)^2$$
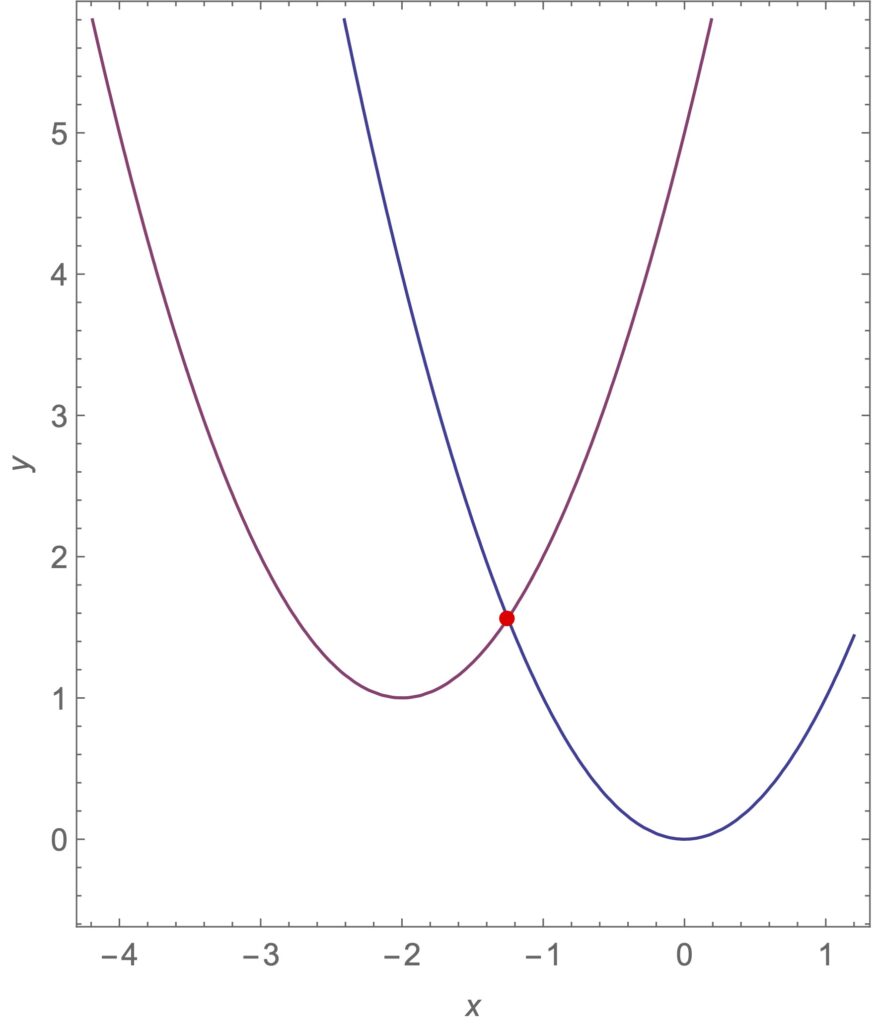
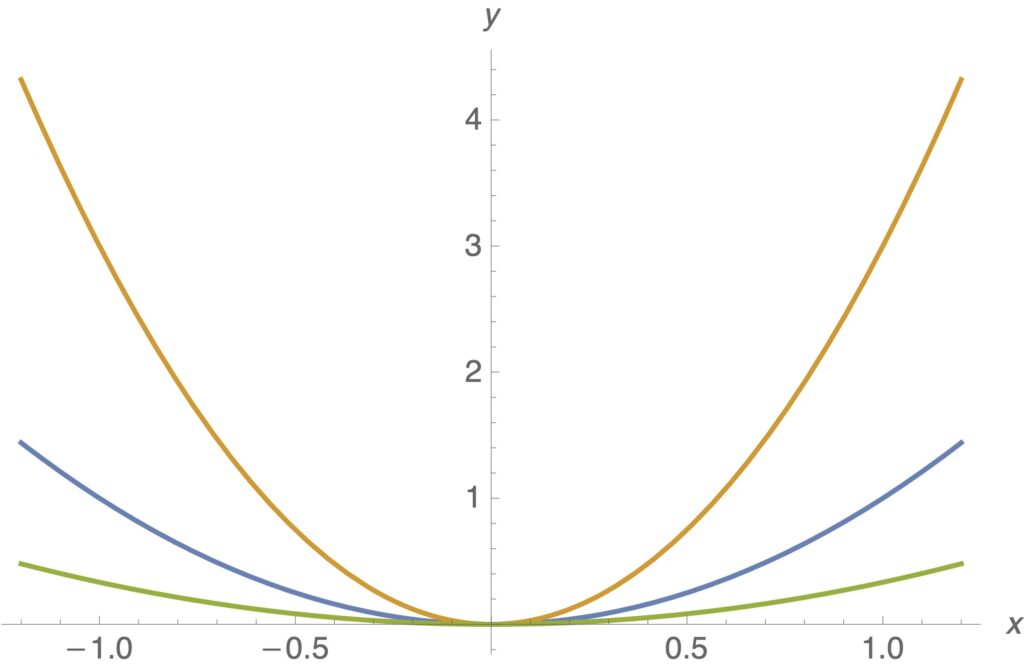
Just as with the ellipses, multiplying by a constant can narrow or expand the shape.
$$y=x^2,y=3 x^2,y=1/3 x^2$$
The final case is when we have a subtraction of the square terms (with circles and ellipses we added the squares). This makes a shape known as a hyperbola.
$$x^2-y^2=1$$
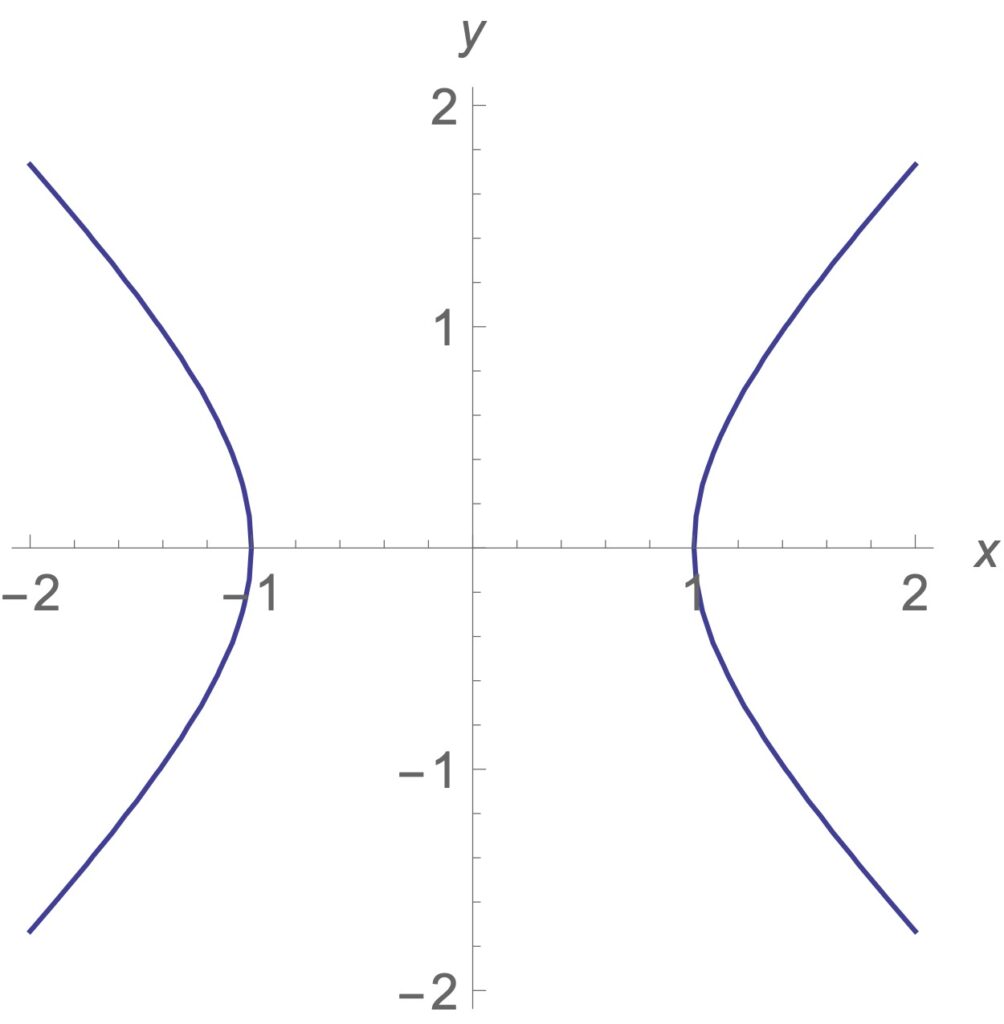
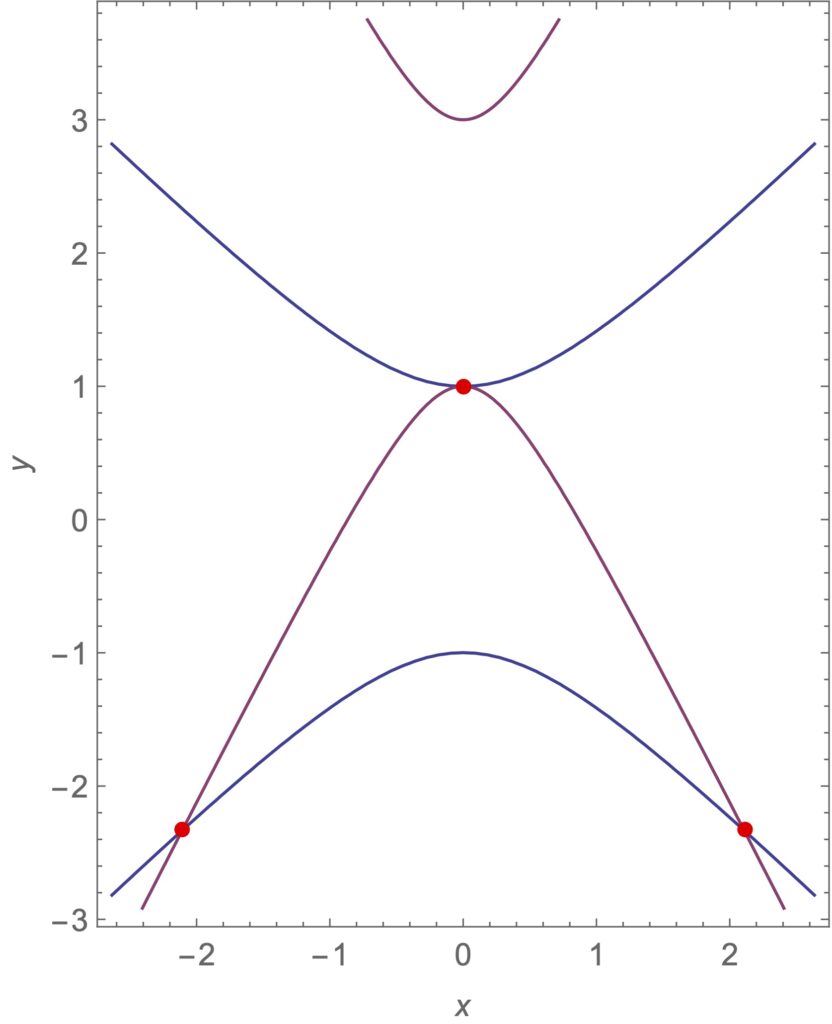
If we make the x squared term the negative one, the hyperbola is rotated 90 degrees. And of course hyperbolas is can be translated by addition or subtraction of a constant inside the square, as well as narrowed or widened by multiplication.
$$y^2-x^2=1,(y-2)^2-4 x^2=1$$
One way of looking at all of these shapes is that if you take an equation of this form:
$$Ax^2 + Bx + Cy^2 + Dy = F$$
And choose any numbers for A, B, C, D, F, then the associated picture is one of the above — a line, a circle, an ellipse, a parabola, or a hyperbola. Those are all the possibilities. For example let A=3, B=-1, C=1, D=-4, F=7, then we get an ellipse:
$$3 x^2-x+y^2-4 y=7$$
Variation
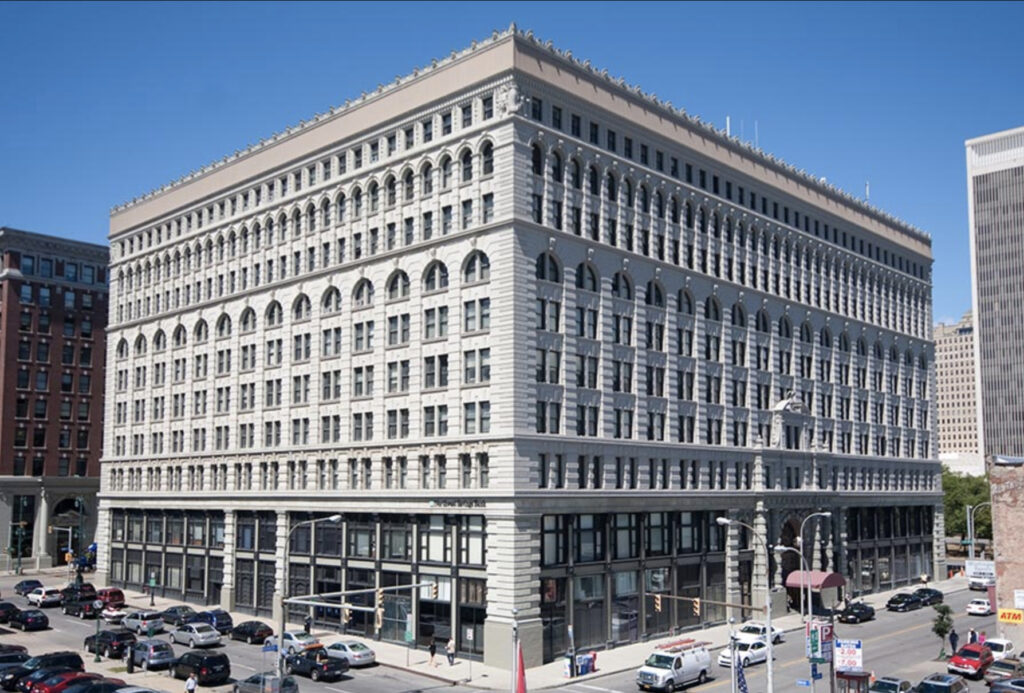
If x and y are such that y = kx2 for a constant k, we say that y varies with x2. The idea is that we focus on the structure of the relationship, as opposed to the constants involved. For example, the area of a square of side x is given by A = x2, and the area of a circle of radius r is given by A =πr2, so we say that in general area varies with the square of the measure of one dimension. Similarly, the volume of a cube that is x on a side is Volume = x3, and the volume of a sphere of radius r is V = 4/3 πr3. So volume varies with the cube of the measure of one dimension. The surface area of a cube is given by SA = 6 x2 (Why?). The surface area of a sphere is given by SA = 4πr2. The fact that surface area and volume grow at different rates has many, many implications for the world around us. One is in architectural design. In general, people prefer windows where they work and live. Windows are on the surface of the building, so the value of a building isn’t just in the volume of the building, because the surface area matters as well. Interior space that is too far from the exterior walls to have a window is less valuable.


The functions y=x2 and y=x3 both grow as x grows, but they do so at different rates. Below are the graphs of y=6x2, which is the surface area of a cube with side length x, and y=x3, which is the volume of a cube with side length x. Notice that for x<6, 6x2 is greater than x3, but once x is greater than 6, it is the other way around. This means that a small cube has more surface area than volume, and a large cube has more volume than surface area.
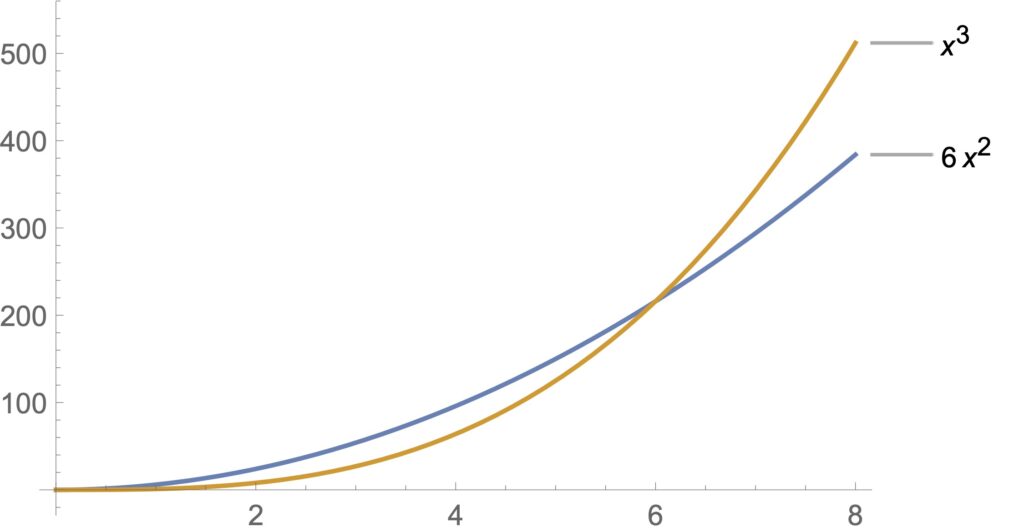
The picture is similar for any 3D shape, that as it scales larger, the volume grows faster than the surface area. Spheres, for example. This has many implications in the natural world. For example, because a mouse is a small sphere, it weighs twice as much wet as it does dry. As a small sphere, it has lots of surface area — the fur that gets wet– relative to its volume — the volume gives the dry weight. The situation is even more dire for small insects — if a drop of water stuck to an ant, its weight would increase tenfold. So insects have evolved such that water does not stick to them.
But being small has its advantages. When an animal falls, it is the force of gravity pulling us down. That force is proportional to the mass or weight, which is basically proportional to the volume. Animals are pretty much all made out of the same stuff, so if you know the volume of an animal, you know its weight.
Now when we animals fall, at least when we fall here on Earth, we fall through air. As we fall there is air resistance — the force of gravity pushes us through the air. You can feel air resistance if you put your hand out the window as you drive down the highway. Air resistance opposes the force of gravity. Air resistance depends on surface area — this is why a parachute works, it has lots of surface area. Air resistance also depends on how fast you are traveling through the air — if you put your hand out the window when you driving 5 miles per hour you will feel hardly any air resistance. The faster you fall, the more the air resistance. At some speed the air resistance will match the force of gravity, and you will not be able to fall any faster. That speed is sometimes called the terminal velocity. And the key point is that for the ant this velocity is not terminal — the ant, being very small, has proportionally much more surface area than volume, so high relative air resistance, and so falls much slower than, say, a human. An ant can pretty much fall from any height without peril. Even a cat, which is much larger than an ant, though of course much smaller than a human, can benefit. In New York City they keep statistics on cats that fall out of windows or balconies of high rise buildings and a high percentage of them survive.
So, here is your mission, should you choose to accept it. There are several good web – based graphing calculators available. One is at : https : // www.geogebra.org. In any case, you need a tool that allows you to graph several equations at once, displaying them together with the equations themselves. You may already have an app that allows you to do this . At
geogebra.org/3d you can do the 3d illustrations and calculations asked for below (problems 11-14).
1. In a single graphing window, graph at least six circles, which have at least three different centers among them.
2. Do the same with six parabolas.
3. Do the same with at least eight straight lines, here there must be at least three different slopes, one of which should be negative .
4. Create an ellipse centered at (0,0), that passes through the x -axis at x=1 and x=-1, and passes through the y axis at y=2 and y=-2. Now using equations move this ellipse to the right 3 units and up 2 units. Then move the original ellipse to the right 3 units and down 2. Then create one to the left 3 and down 2, and left 3 and up 2 — five ellipses in total.
5. Use the graphing calculator to create at least six different patterns. Each pattern should have at least six elements to it– for example one pattern might have four circles and two lines and two ellipses in it. Another might be six parabolas. The patterns should have some sense of order or design to them– not be simply a collection of random elements. In your collection of patterns, you should use at least five of each type of element. Take a screen shot of each pattern, and the screen shot should include the equations of the elements in that pattern. To repeat : you should turn in at least six screen shots. In each shot should be some combination of at least six elements, where the elements are lines, circles, ellipses, parabolas and hyperbolas. In your total collection of patterns, you should have used at least five of each type of element .
6. Parabolas have a remarkable number of applications. Do a little research and find three applications of parabolas– describe them .
7. Describe two applications of ellipses .
8. Describe three applications in the natural world of the fact that surface area and volume grow at different rates.
9. Graph the area and volume functions for the cube on the same axes. Where do they cross?
10. Graph the area and volume functions for the sphere on the same axes. Where do they cross?
11. Find a tetrahedron where the surface area is greater than the volume, and one where the volume is greater than the surface area.
12. Imagine an office building built of 10 ft cube office blocks, that is itself a large cube, 40 ft in each direction. What percentage of the offices have windows? What is the case if the building is a cube, 100 ft in each direction? (Hint — it may be easier to count the number of offices without windows). How do these calculations relate the buildings depicted above?
13. Design two buildings, each with at least 100 offices that are 10 foot cubes, where each office has a window. (You don’t have to worry about hallways, stairs, etc — just the arrangements of the cubical offices.)
14. Design a building with a shape that is not rectangular, which you think would have a good ratio of surface area to volume.
Saint Anselm College is committed to creating a safe learning environment free from gender and sex-based discrimination, including sexual harassment, domestic and dating violence, sexual assault, and stalking.
- If you have (or someone you know has) experienced any form of sex or gender-based discrimination or violence and wish to speak with someone confidentially, please contact Nicole Kipphut at The Harbor.
- If you would like information about the Title IX procedures, reporting, or Supportive Measures, please contact Title IX Coordinator Marcie Vaughan or visit https://www.anselm.edu/about/offices-centers-institutes/student-affairs/title-ix/college-policy
All Faculty are Required Reporters and must inform the Title IX Office of all information that may implicate Title IX. However, disclosures of gender and sex-based discrimination or violence directly relevant to, and made in response to, a course an assignment/classroom prompt will not result in a referral to the Title IX Coordinator. In such circumstances, I may provide the student with a packet of information about violence prevention and resources available on and off campus.
Saint Anselm College is committed to providing students with documented disabilities equal access to all college programs and facilities. Students with learning disabilities, chronic medical conditions, mental health diagnoses, autism, hearing and visual impairments, and other concerns may qualify for academic accommodations. If you are experiencing diagnosis-related barriers to accessing your learning, please contact Hannah Davidson, Associate Director of Disability Services, located in the Academic Resource Center (ARC). To ensure that accommodations are arranged in a timely manner, you are encouraged to make your request at the beginning of each semester. For questions or to begin the accommodations process, please contact Dr. Hannah Davidson at [email protected] or 603.641.7194.